◤ Field Build Guide ◥
BUILD A NODE
Everything you need to build a CicadaTAK mesh radio from off-the-shelf parts — some soldering and assembly finesse required.
Flash Firmware
◤ Field Build Guide ◥
Everything you need to build a CicadaTAK mesh radio from off-the-shelf parts — some soldering and assembly finesse required.
Flash FirmwareWant to skip the fiddly 90%? The Builder Kit ships this exact build pre-assembled up to the radios — sled mounted, Pi + HAT seated, loom crimped, bulkheads installed, SD flashed. You add the WM6108 and the Heltec with a screwdriver, about 20 minutes.
Full step-by-step assembly walkthrough — soldering, the WM6108 / WM1302 stack, PiSugar power, and GPS & LoRa wiring through first boot.
| Component | Source |
|---|---|
| Raspberry Pi 4 (4 GB)Any Pi 4 Model B | — |
| microSD Card (64 GB)Class 10 / A1 — the firmware image is flashed to it; the offline-map tile store grows to fill the card | — |
| Seeed WM1302 Pi HATmini-PCIe carrier HAT for the HaLow module | Seeed ↗ |
| Seeed WM6108 HaLow ModuleWi-Fi HaLow (802.11ah) mini-PCIe — the mesh radio | Seeed ↗ |
| Heltec V3 LoRa BoardMeshtastic LoRa bridge | Amazon ↗ |
| PiSugar 3 Plus UPSUninterruptible power / battery management | Amazon ↗ |
| 3.7 V 10,000 mAh 1160100 LiPo BatteryPouch cell w/ PH 2.0 plug + protection board — powers the node through the PiSugar UPS. Runtime-validated ~7 h at full dual-radio load. Max pack size 60 × 110 × 13 mm (pouch cells only — cylindrical packs don't fit); skip "15000 mAh" no-name packs, they measure ~40% of label | Amazon ↗ |
| u-blox GT-U7 GPS (USB) — optionalOptional: the radio HAT has onboard GPS (the default — just plug the GPS antenna into the HAT). Add a USB u-blox only if you want a second GPS source; when plugged in, the node uses it automatically | Amazon ↗ |
| FILN 12 mm Momentary Push Button5–24 V momentary switch | Amazon ↗ |
| Micro-USB → USB-A cable, 5 cmModel AMUP-V8ST — GPS to Pi | AliExpress ↗ |
| USB-C → USB-A cable, 10 cmModel AMUP-CMST — Heltec to Pi | AliExpress ↗ |
| JST 2.0 2-Pin ConnectorsMale & female pair — 2-pin wiring | Amazon ↗ |
| USB-C Panel-Mount CouplerUSB 3.1 flush-mount pass-through — the enclosure’s external power/data port | Amazon ↗ |
| USB-C 90° Flat Cable (75 mm)Dual right-angle USB 2.0, PD 65 W — internal jumper, coupler → Pi | Amazon ↗ |
| IPEX U.FL → SMA Female CableAntenna pigtail for the HaLow module | Amazon ↗ |
| BNC Antenna ConnectorsAntenna connectors | Amazon ↗ |
| 900 MHz AntennaYour choice — Rokland Meshtac Gooseneck, ZBM2 Mesh Whip / Gooseneck, or Gotak Mesh Gooseneck all perform well | — |
| GPS AntennaExternal GPS antenna — we run the ZBM2 GPS Stubby for a rugged bulkhead mount (the GT-U7 also ships with a basic active antenna) | — |
| Enclosure3D-printed or off-the-shelf project box | — |
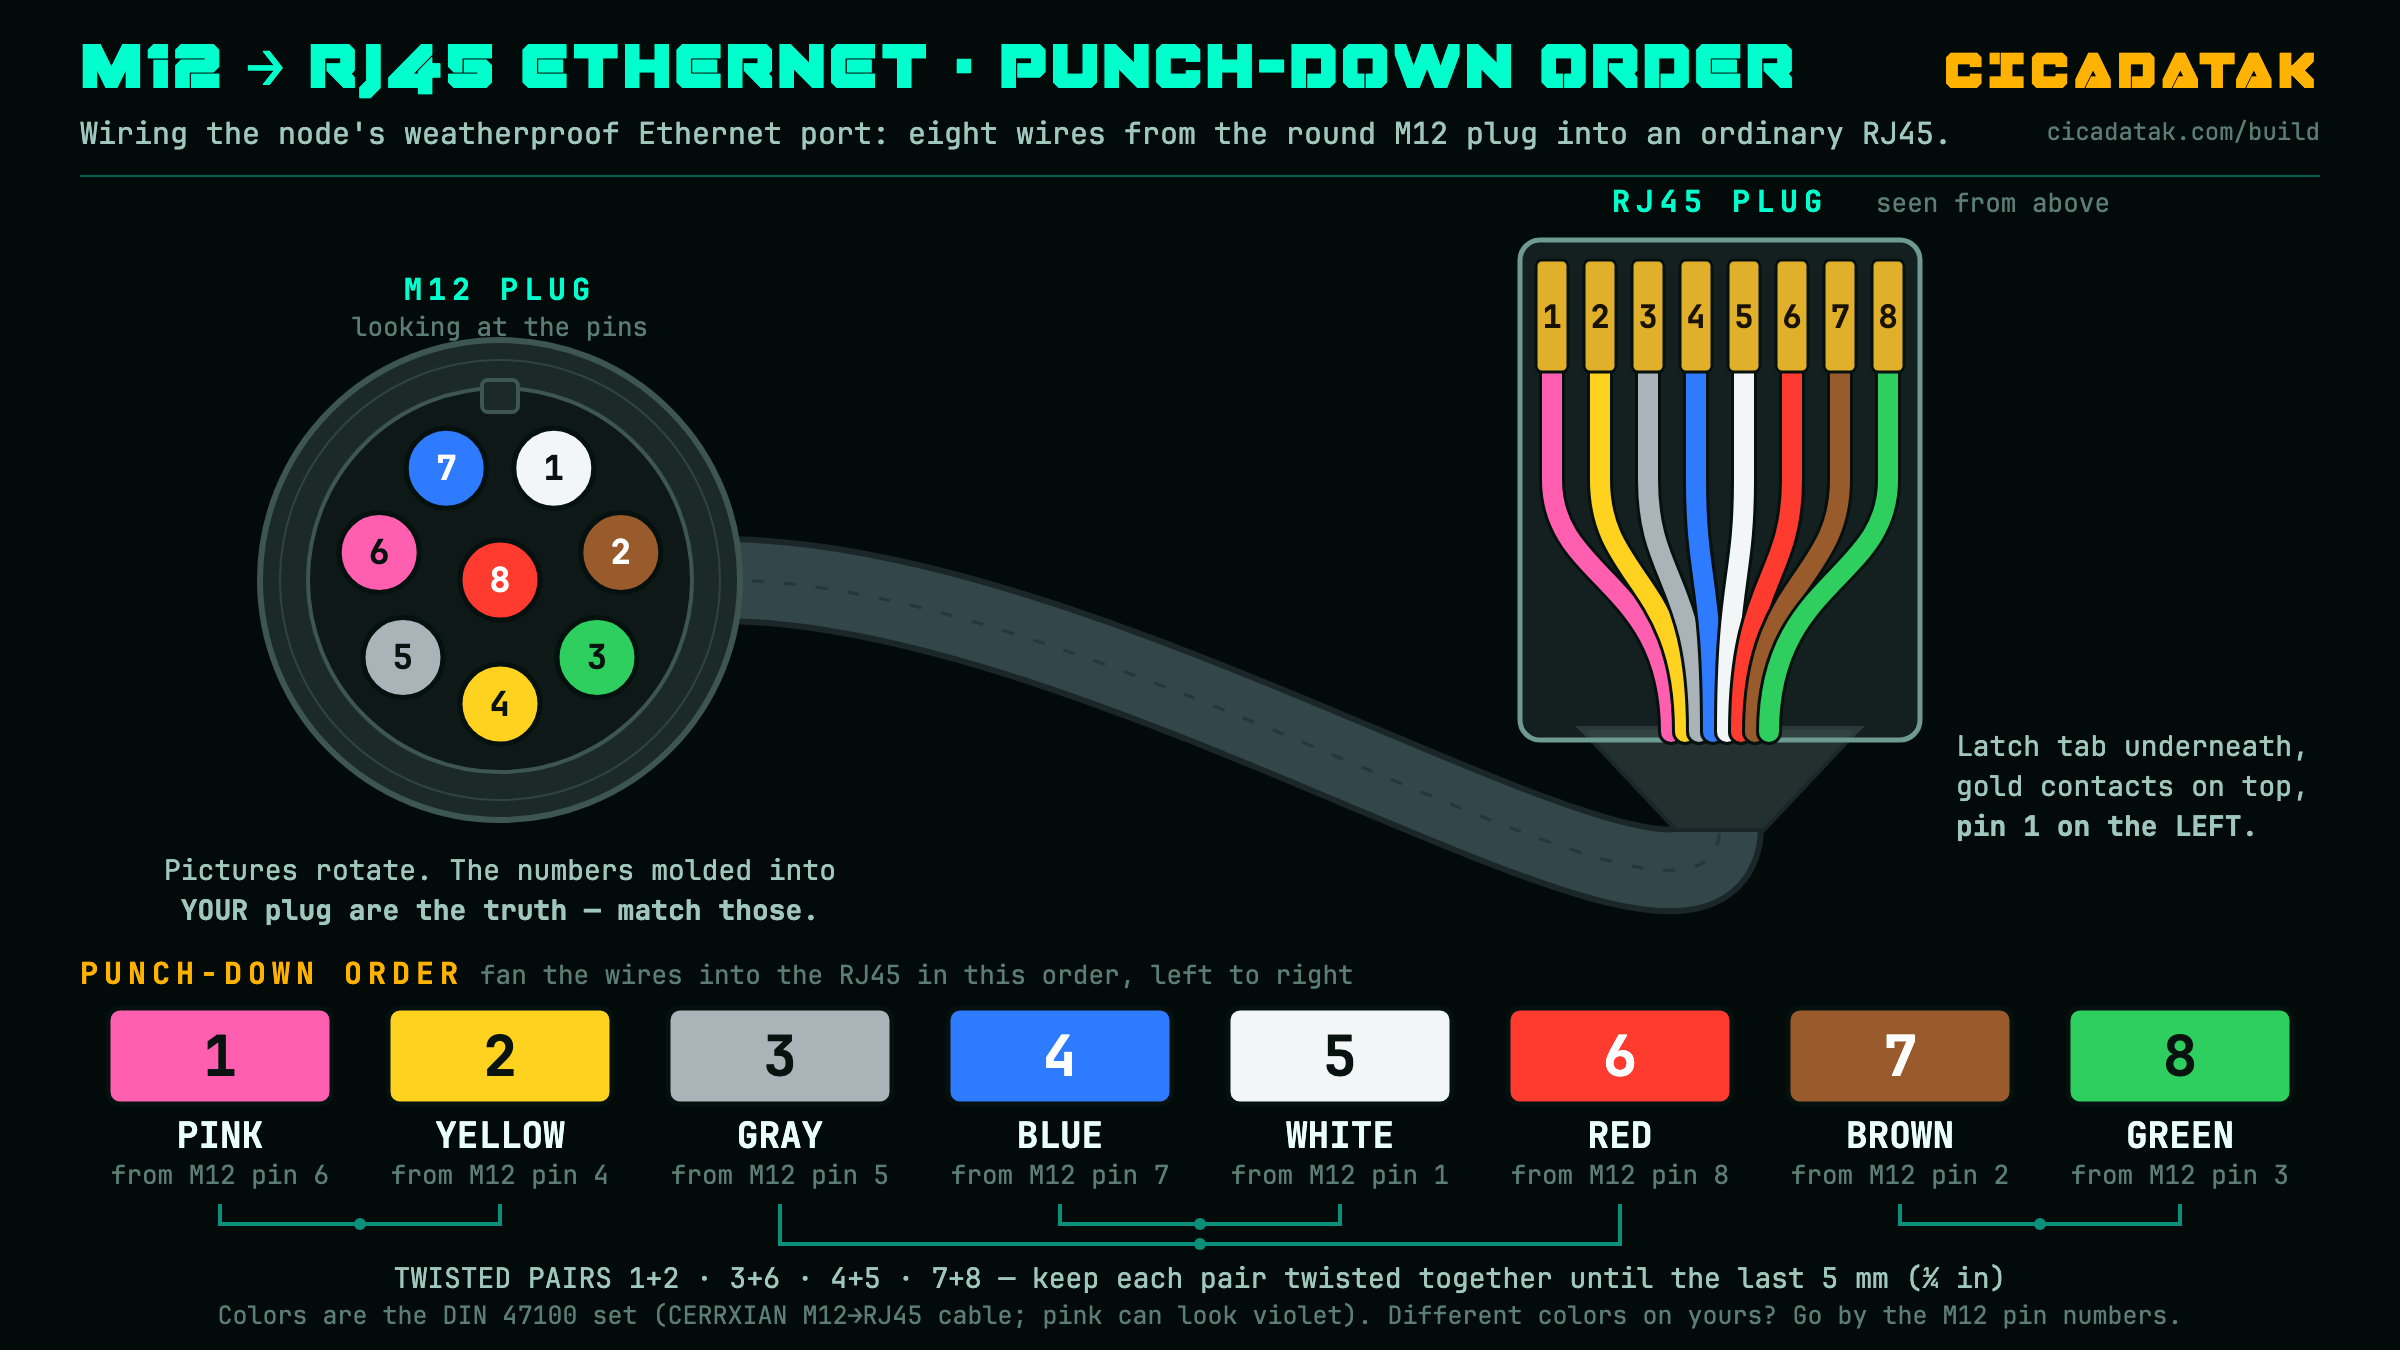
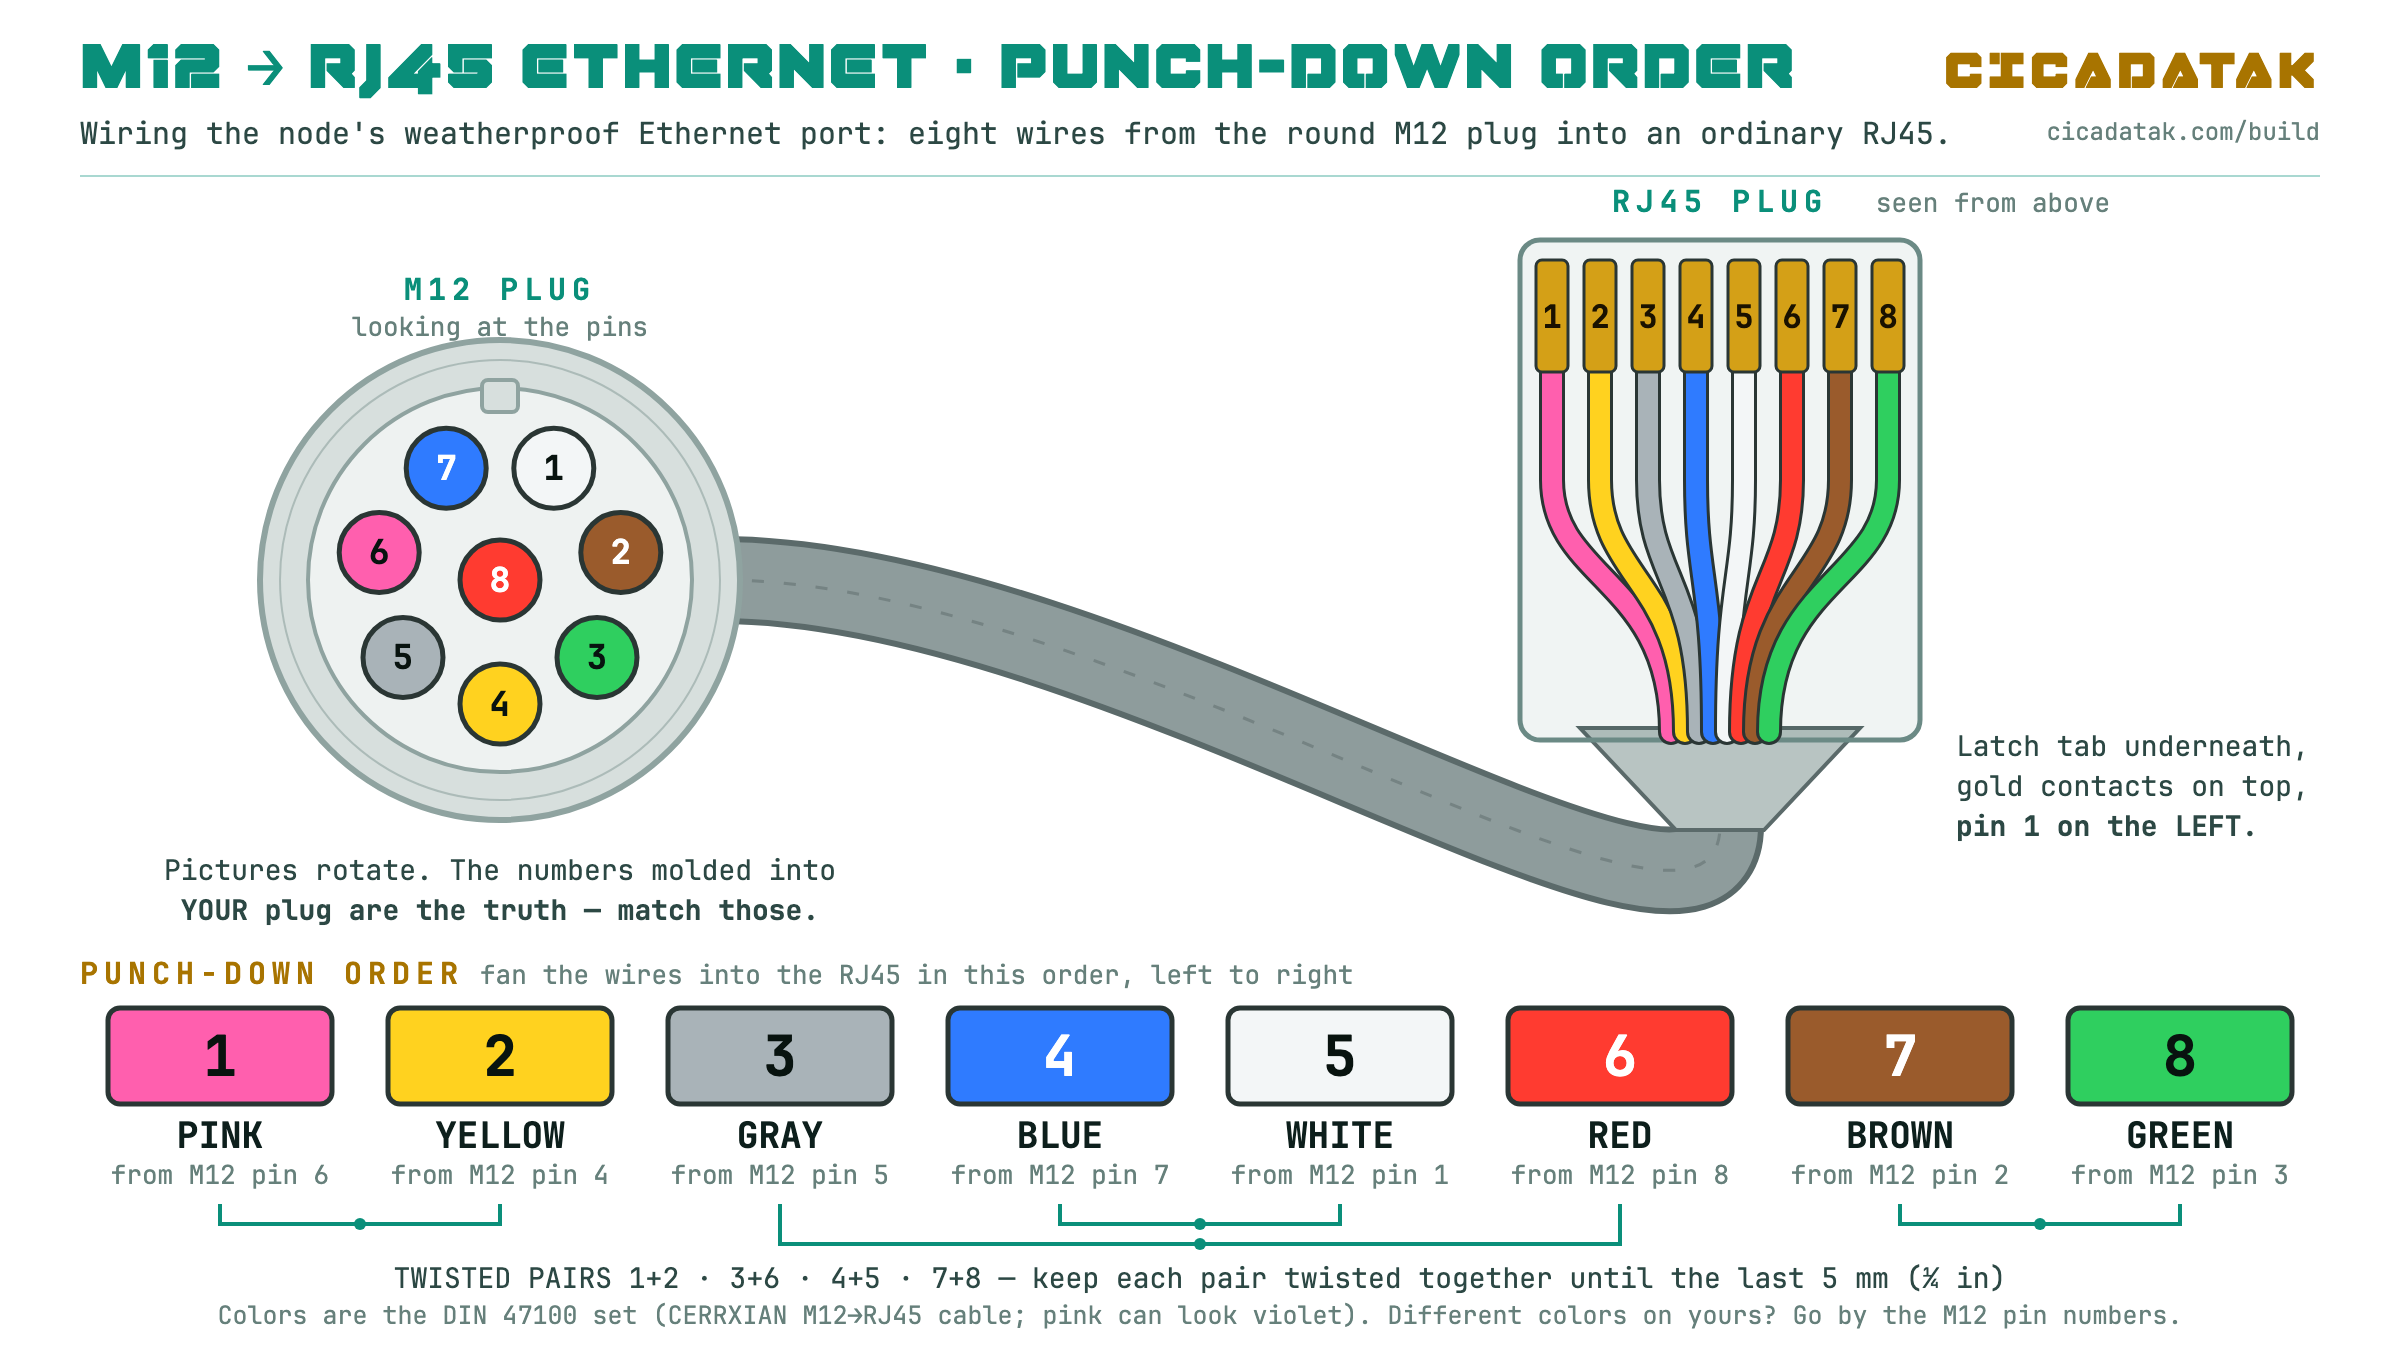
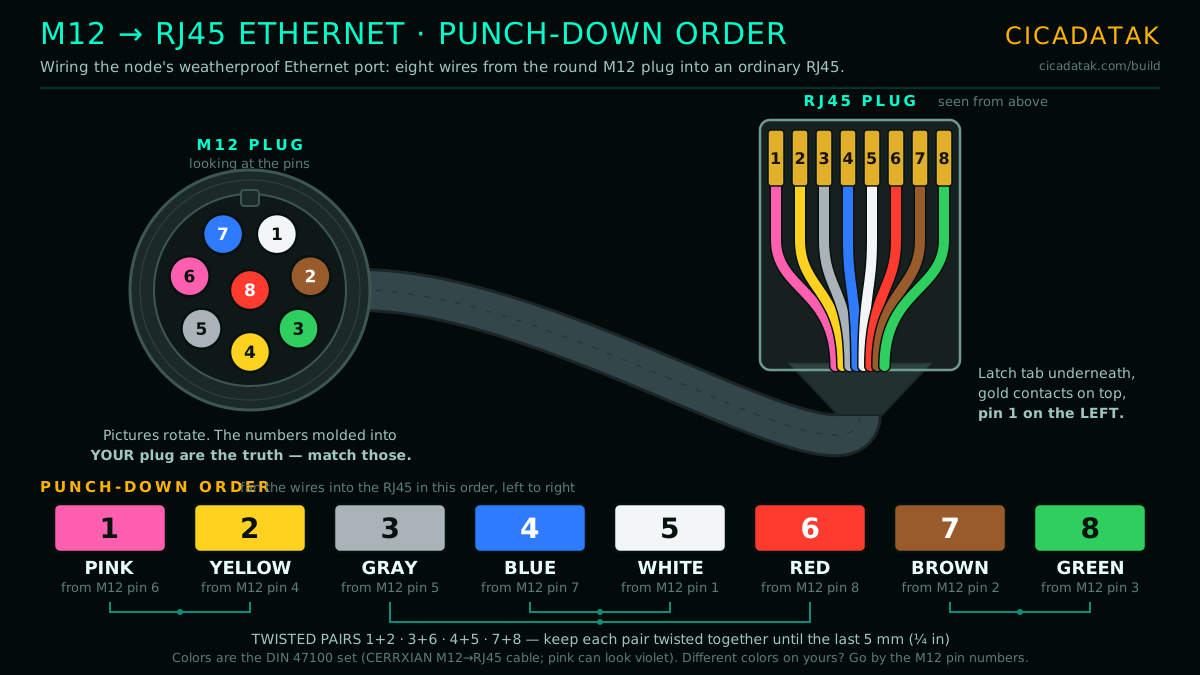
/opt/cicadatak/gps-survey.sh --qa -e outdoors. It takes about five minutes. PASS means satellites are really being received. FAIL — zero satellites in view means reseat the GPS antenna connector and run it again.Optional, but worth it. An M12 8-pin bulkhead gives the node a weatherproof gigabit Ethernet port — plug in a laptop, or a router or Starlink to give the whole mesh internet. Outside the case it takes an off-the-shelf M12-to-RJ45 cable; inside, the bulkhead's eight wires end in an ordinary RJ45 plug that you crimp yourself. This is the order that works:
No SSH, no command line, no web interfaces — the app handles all configuration.
Need internet on the mesh? Plug an ethernet cable from a router, hotspot, or Starlink into any node. The entire mesh gets internet automatically.
The Heltec V3 LoRa board bridges Meshtastic alerts and positions onto the mesh — extending reach beyond HaLow range to the wider Meshtastic ecosystem.
Add CicadaTAK directly to the Raspberry Pi Imager OS selection:
This adds "CicadaTAK" to the OS menu with description and version info.
Check the support page for troubleshooting, or email info@cicadatak.com.