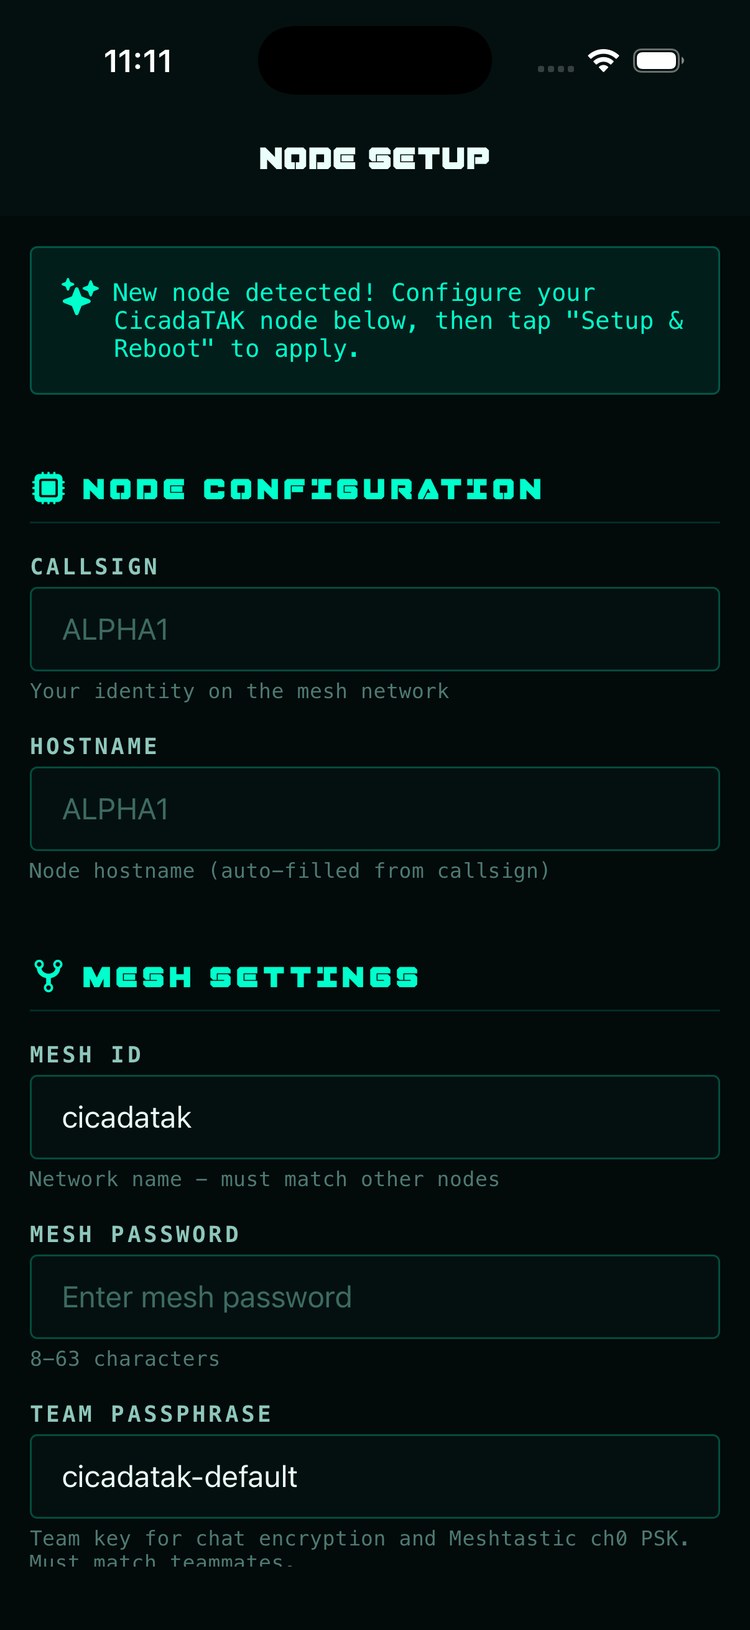
Flash a card (download page), insert it, power the node. On first boot it broadcasts an open WiFi network named CicadaTak-XXXX (the XXXX is unique to the node). Join it from your phone and open the CicadaTAK app — the NODE SETUP wizard takes over the screen ("New node detected!"). The fields, top to bottom:
Node name & callsign. The node name labels this node on the mesh and becomes the name of its WiFi network after setup; the callsign is your identity — it labels your dot, your chat messages and your position broadcasts. From node firmware 0.23.0 the name starts out as Cicada- plus the same four characters as the setup network (CicadaTak-3A7F offers Cicada-3A7F), so two new nodes never start with the same name. Keep it or type your own, but give every node on a team a different name: two nodes with one name show up as one node. With node firmware 0.23.0 and the app update after 1.2.46, a name is up to 32 letters, numbers and hyphens (not starting or ending with a hyphen, and not starting with LORA- or ATAK-), and you can rename the node later (§13). The callsign can change later (node firmware 0.23.0 with the app update after 1.2.46): Settings → Operator’s Info → Callsign. It changes straight away, with no restart, so a team can hand out nodes at deploy and each person sets their own. Your teammates see the new name on their next update, and your earlier chat and markers keep the old one. If someone on the team already uses that callsign, the change still goes through and the app tells you, so you can pick another. From node firmware 0.23.0 a callsign can’t contain $ or `, at setup or later; with the app update after 1.2.46 the field says so before you save. On older node firmware the field shows the callsign but cannot change it: update the node first. The short name changes the same way (node firmware 0.23.0 with the app update after 1.2.46): Settings → Operator’s Info → Short name, just under Callsign. It is the short label Meshtastic radio screens and the Meshtastic apps’ map pins show for your node. Up to 4 characters, where an accented letter counts as two and an emoji as four; leave it empty to use one made from your callsign (the empty field shows it, for example auto: 1CX). A short name you set stays when you change your callsign; one made from your callsign follows it. On a node running MeshCore there is no short name, and the field is not shown; on older node firmware the field cannot change it: update the node first.
WiFi password. For the node's own WiFi network after setup — what your phone joins in the field. Pick a password you'll remember at 2 AM.
Mesh Network ID & mesh password. The radio-level credential the HaLow radios authenticate with. Every node you want in the same mesh must get the exact same Mesh Network ID and mesh password — enter identical values in the wizard on each node. On firmware 0.13.0 and newer the mesh password is required and there is no built-in default: choose one and reuse it on every node you flash. (Older firmware accepted a blank field and applied a shared default. If you have nodes set up that way and want a new node to join them, type that old value here.)
Team passphrase. The crypto key — team chat encryption and the Meshtastic channel PSK. It arrives pre-filled with cicadatak-default, and that default is public knowledge: anyone who has read this website can decrypt traffic on it. Replace it here, before the node ever carries real traffic, and have every teammate enter the same phrase in their own wizard. (If your phone already carries your team's rotated key, the wizard pre-fills that instead — a new node joins the team with no retyping.) You can rotate it any time later by QR (§03).
Region (firmware 0.11.0+). The country this node will actually be operated in — United States (also correct for Canada and Mexico) or Australia. This is not a display preference: it sets every radio on the node to a legal configuration for that country — the HaLow channel plan and power, the 2.4 GHz country, and the LoRa band. The two plans use different frequencies and cannot hear each other, so the whole team must match. Leave it on United States unless you are in Australia. Changing it later no longer means re-flashing the card (firmware 0.15.0+, with a current app): Settings → Radios → Region shows the region the connected node is set to — read from that node, so walking to a second node shows that node's answer — and lets you change it. Because that is a radio change and not a preference, the node reconfigures its radios to the new country's plan and reboots, then drops off the mesh until the rest of the team moves with it. Move a whole team together, never one node at a time. On older node firmware the card says so instead of offering the choice. ⚠️ Updating a node's firmware does not change its region — the setting is deliberately preserved across updates, so a node that was set up as United States stays United States until you change it on purpose. If your app doesn't show this step, it's an older build and will set the node to United States without asking — update the app, or run the wizard in a browser instead: join the node's CicadaTak-XXXX WiFi and open http://192.168.4.1 (most phones and laptops pop it up on their own as a sign-in page), which is the same wizard with the same fields. ⚠️ The browser fallback needs firmware 0.15.0 or newer. On 0.11.0–0.14.0 the browser wizard shows a Region dropdown that it never actually applies — it looks like it worked and the node comes up United States regardless. On those versions the app is the only path, so if you're outside the US, update both before setting up a node.
LoRa protocol (firmware 0.9.0+). Meshtastic (the default — every node relays, and every Meshtastic device on earth can join your map) or MeshCore (join the public MeshCore community mesh). The two cannot hear each other on the air, so your whole team must pick the same one — the node flashes its LoRa radio with the matching firmware during setup, and you can switch later in Settings (§09). The LoRa step is the long one — from node firmware 0.23.0 with a current app the screen says what the radio is doing while it runs, and if the radio answered but did not take its settings, setup still finishes and tells you the node will finish setting it up after the restart; nothing else to do. Choosing Meshtastic also offers a short name of up to 4 characters for the radio's little screen (an accented letter counts as two and an emoji as four); leave it blank and the node derives one from your callsign (CicadaGreen → GREE; from node firmware 0.23.0 an all-capitals or numbered callsign keeps its whole word and its number, so 1CX → 1CX and CX-1 → CX1, where older firmware gave X and 1). A node with no short name set renames its radio once, to the new one, the first time the radio connects after the update. You can change it after setup (Operator’s Info, above).
2.4 GHz mesh backhaul. Only appears if a 2.4 GHz USB radio is plugged in. Leave it on — it adds a second, much faster mesh link between nodes that are close together, while your long-range HaLow mesh carries on unchanged. No radio fitted, no question asked.
Node color. How your dot, trail and labels render on everyone's map — pick a different color per teammate. These are ATAK's own 14 team colors, so the color you pick here is exactly the color ATAK users see. ⚠️ A recent app update changed this list — it is the app that carries the color picker, so updating your node's firmware alone will not change it. Earlier versions offered Amber, Gray and Black, which ATAK has no name for — those three all arrived on an ATAK map as Cyan, indistinguishable from each other and from real Cyan users. If you were using one of them, the app moves you to the default and tells you once in Settings so you can pick a new one.
What is this node? (firmware 0.15.0+). Worn (the default — someone is carrying it), Vehicle, Fixed relay for a mast or rooftop, or Unattended for a spare. This only changes how the node appears to ATAK users: a worn node is drawn as a team member, and the other three are drawn as equipment. Before this, every node — including a relay bolted to a roof — appeared on an ATAK map as a friendly soldier. Get it right and a mixed team's map stops filling with people who are actually radios. You can change it later in Settings → This Node → Node Configuration.
Callsign length. Up to 40 characters, which is ATAK's own limit — emoji and line breaks are removed as you type, because ATAK strips them too and a name that changes shape between apps helps nobody.
Setup & Reboot. The node applies everything and reboots (give it a minute or two). Its new WiFi appears under your node's name — join it and the app connects. GPS is automatic: every node has an onboard receiver on its radio HAT (plug the GPS antenna into the HAT), and if a USB u-blox GPS is attached the node uses that instead — unplug it and the node falls back to the onboard GPS on its own. A factory-fresh Heltec LoRa board gets flashed with the right firmware automatically.
The wizard deliberately asks no radio questions — HaLow channel and bandwidth are operational settings, tuned later from the app and moved fleet-wide so the mesh stays together (§10). Being the mesh's gateway to the internet is automatic: a node with an internet connection (ethernet, a USB LTE modem or phone tethering) takes that job on its own and hands it back when the connection drops, so there is nothing to set.
Mesh credential vs team key — know the difference. Mesh Network ID + mesh password decide which radios can peer at all: a node with different values is a separate mesh and simply never appears, no error shown. The team passphrase decides who can read the traffic. Mesh credentials are set per node in this wizard; the team key can be rotated later from Settings and shared by QR.
The wizard — identity and mesh credentials
02After the wizard
When the wizard finishes, the node reboots and comes up as a password-protected WiFi access point named after your node. Join it from your phone and the app connects to the gateway automatically (it lives at 10.41.254.1 — already set as the default). Your callsign, color and team key are already set from the wizard; three things are still worth doing before you ever leave the house:
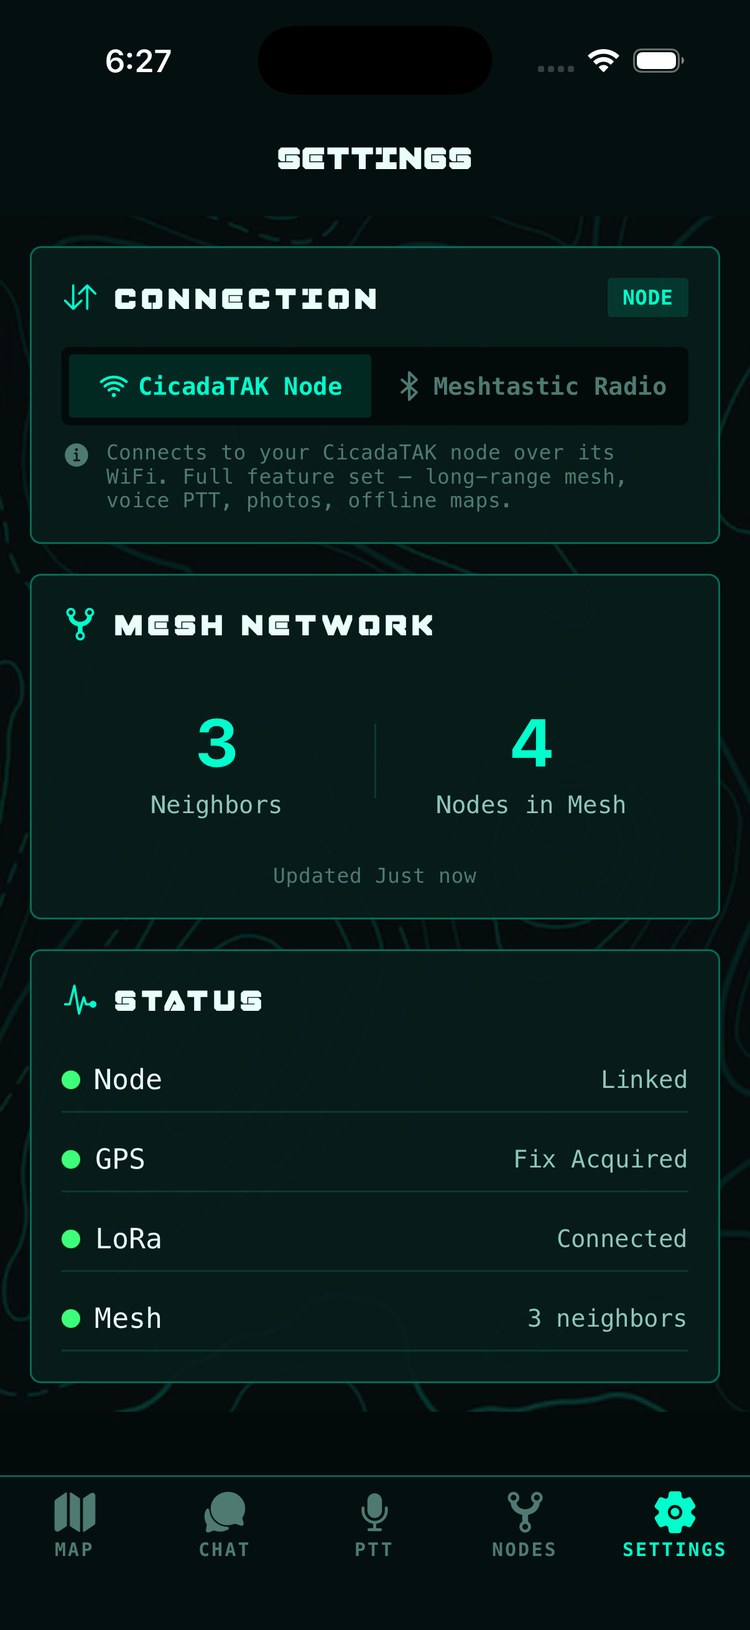
Finding your way around Settings. Settings is a list of seven pages — Connection, Operator’s Info (your callsign, short name, team role and color), Team (the team passphrase, private messages, clearing team data and ATAK Compatibility), Map, Alerts & Sound, Radios, This Node (firmware, Node Configuration, reboot, setup). Tap one to open it; the line under each name tells you its current state at a glance (Team warns you in amber while the passphrase is still the default). Before the app update after 1.2.46 there was an ATAK page instead of Operator’s Info: its settings now live on the pages above.
Left the team passphrase on its default? The wizard pre-fills it, and tapping past that field means anyone who has read this website can decrypt your traffic. Set a real one now — Settings → Team → Team passphrase (§03) — before anything sensitive goes over the air.
Download offline maps for your area. The image ships with a coast-to-coast overview only. Pull satellite detail for your operating area while the node has good internet — see §04.
Send a test message and watch the map. Your own dot should appear once GPS gets a fix (Settings → Connection → Status shows GPS Fix Acquired). With a second node up, ping it from the Nodes tab.
Indoors and your dot won't appear? On firmware 0.8.0+ it usually will anyway: while the app is open and connected, your phone quietly lends the node its own GPS, so teammates see you even when the node itself can't get a fix. Close the app and the dot greys after about a minute — expected, not a fault.
No GPS on a relay you've mounted somewhere? Settings → Map → Fixed Position lets you drop a pin (or type lat/lon) to anchor it on the map. The pin map shows whichever map you picked on the main screen, including a map stored on your phone.
Your dot follows the node's GPS and falls back to your phone's only when the node has no fix and the phone's fix is believable — taken after the node's last report and accurate to within about 50 m, or still right where the node last was (a phone sitting still). A rough phone fix (from Wi-Fi or cell towers rather than GPS) is not used as you, even when it is newer. An old phone fix from somewhere else is never used as you, so a brief dropout leaves your dot at the node's last known spot instead of jumping. Settings → Map → Position Source forces one side (Node GPS or Phone GPS) when you know which receiver to trust.
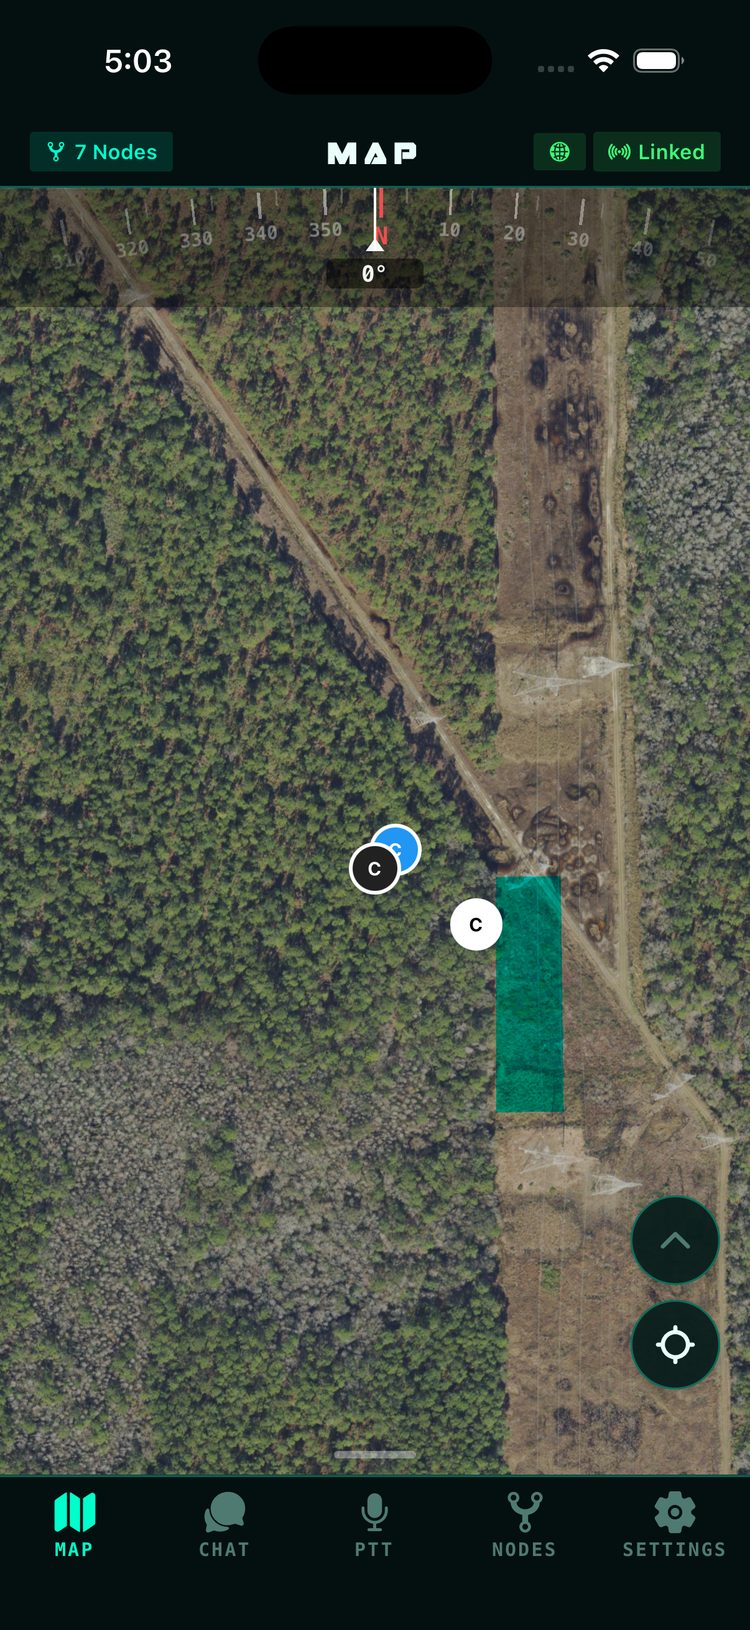
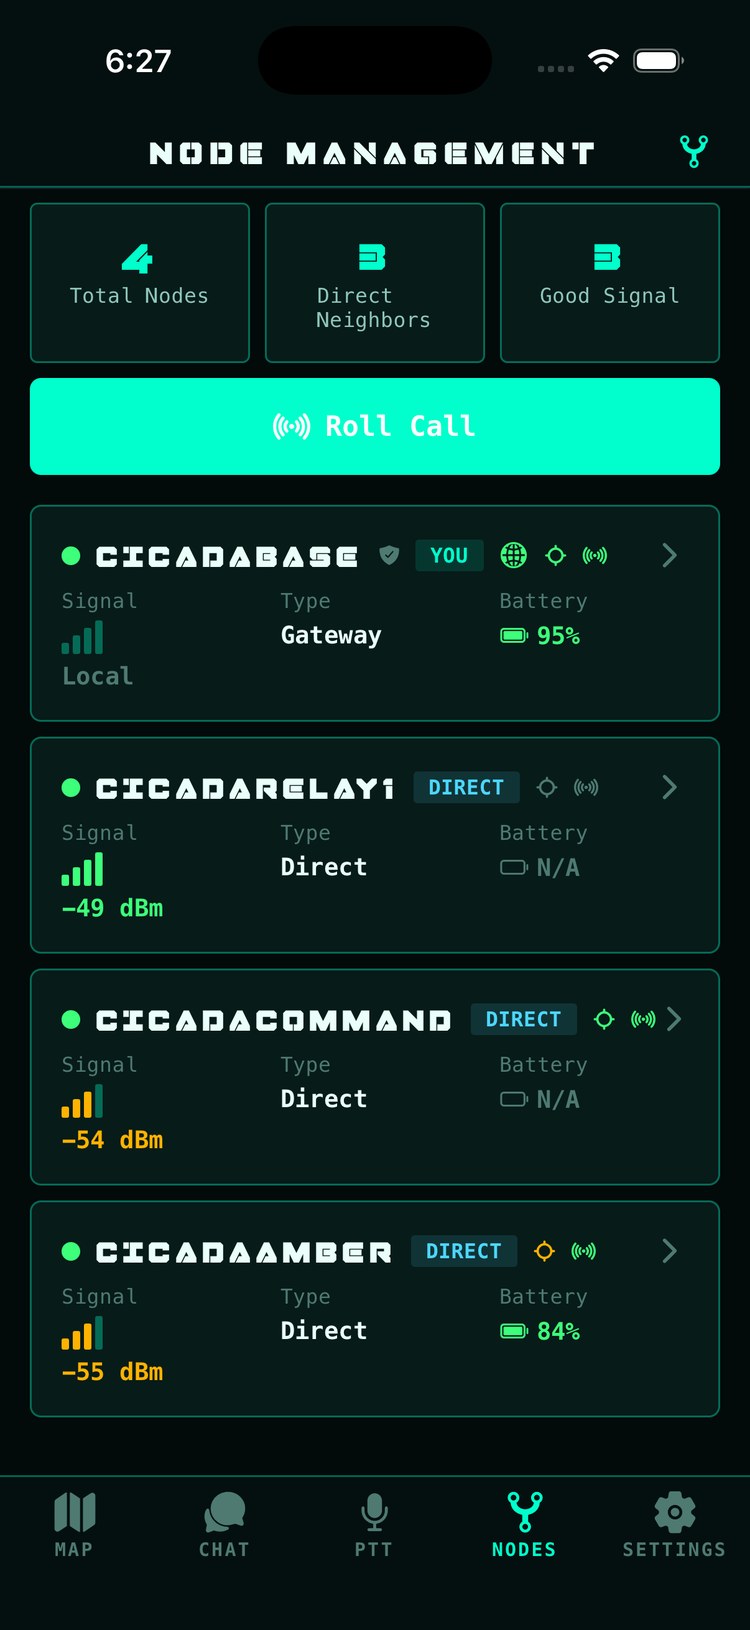
The map, minutes after setupNodes tab — the fleet at a glance
03Lock in your team key
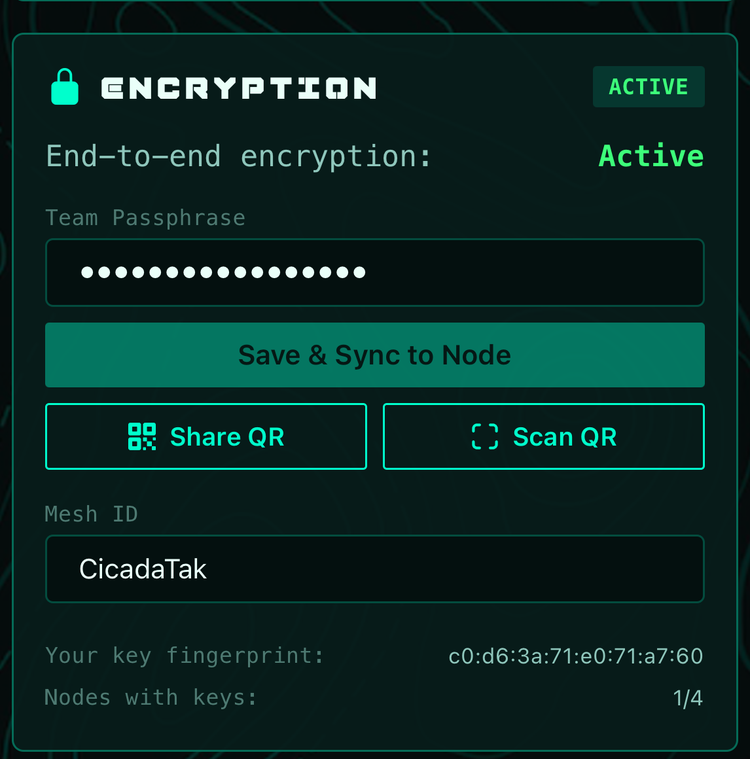
One passphrase drives all of CicadaTAK's team crypto: team chat encryption between phones, and the encrypted Meshtastic channel on the LoRa side. You typed it once in the wizard (§01) — this is how to rotate it later and carry it to the rest of the team without anyone retyping it.
Rotate it: Settings → Team → Team passphrase → enter a new phrase → Save to this node. Your phone and your connected node now use the new key. A node nobody carries (a relay, Base) needs it too: join that node's Wi-Fi and save the passphrase there, because the QR below only reaches phones and radios. The card warns you when this phone is still on the default passphrase, including when a teammate on the default shared it by QR.
Share it: tap Share QR and let each teammate scan it with their CicadaTAK app (Settings → Team → Scan QR). The QR is a standard Meshtastic channel-share code, so a vanilla Meshtastic radio or the Meshtastic app can scan the same code to join the encrypted channel. Because it is a full channel-share code it also carries a LoRa region — scanning it sets the scanning radio's frequency band, so make sure it's the right one before you hand it round. The share screen shows which region the code carries: connected to a node, it's the region that node was set up with, and nothing to think about; with no node connected — a phone talking straight to a LoRa board over Bluetooth — the app has no way to know your country, so it asks once and remembers. Older app builds don't show this and always write United States — outside the US, update the app before sharing a code.
Each teammate syncs their own node: after scanning, their app pushes the key to whichever node they're connected to. And when a phone that carries the rotated key sets up a new node, the wizard pre-fills it — new hardware joins the team's current key automatically.
App 1.2.46 and earlier also showed a "Mesh ID" field on this page (some test builds called it "Phone label"). It did nothing, and the app update after 1.2.46 removes it: the team passphrase is the only thing teammates need to share.
Caveats. The wizard pre-fills cicadatak-default — anyone who has read this website can decrypt traffic on that default, so replace it (in the wizard, or here) before real use. Rotation applies per node: "Save & Sync" updates the node you're connected to, and teammates carry the new key to theirs by scanning the QR — there's no single fleet-wide rotate button.
Settings → Team → Team passphrase — set, save, share
04Download offline maps
A fresh node carries overview tiles for the continental US (~1 GB) — enough to see the shape of the country, not enough to navigate a trail. Detail lives on your node's SD card, and it's why we recommend a 64 GB card: setup grows the node's map storage to fill it (node firmware 0.23.0 and later). Downloads come from the USGS over the node's internet uplink, so do this at home, not in the field.
Two things are required — and this catches everyone. Tiles download to the node's SD card, not your phone: the node is what fetches them, and it keeps them for every phone that connects to it later. So you need (1) your phone connected to the node — join its WiFi, the same network you used after the wizard — and (2) the node connected to the internet, easiest by running an ethernet cable from your router to the node. Your phone's cell data is not used for the download and can't substitute for either one. Cabled up like this you keep internet on your phone too, since the node routes it through. The app greys out the download buttons and tells you which of the two is missing.
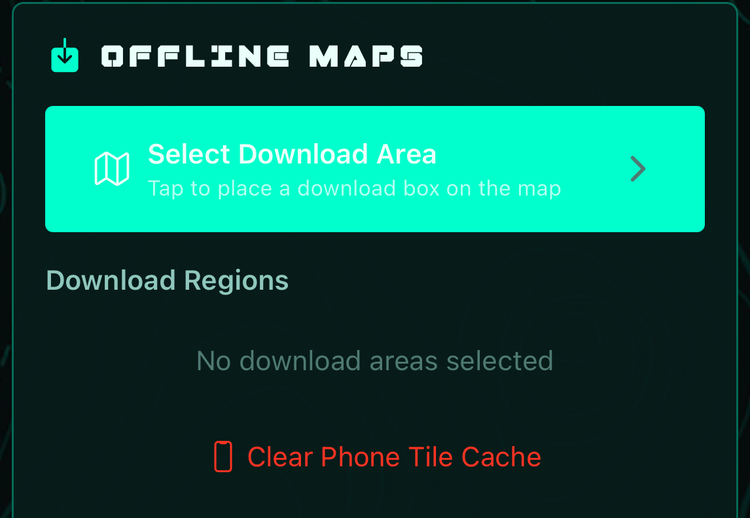
In the app: Settings → Map → Offline Maps → Select Download Area.
Tap the map to place a download box (20 × 20 miles by default, shrinkable to 5), pick the size, and hit Save Area — it's auto-named Area 1, Area 2, and so on.
Pick a tier: Overview (zoom 10–15) for the shape of the ground, Detail (zoom 16–18) to navigate by, or All. Tile counts and times scale hard with box size — a 20 × 20 mile box is ~1,300 overview tiles (about half an hour) but ~75,000 detail tiles (plan on a day or more); shrink it to 5 × 5 and detail is ~4,800 tiles, around two hours. Start Overview-first over the area you actually care about, then add detail to the part you'll walk.
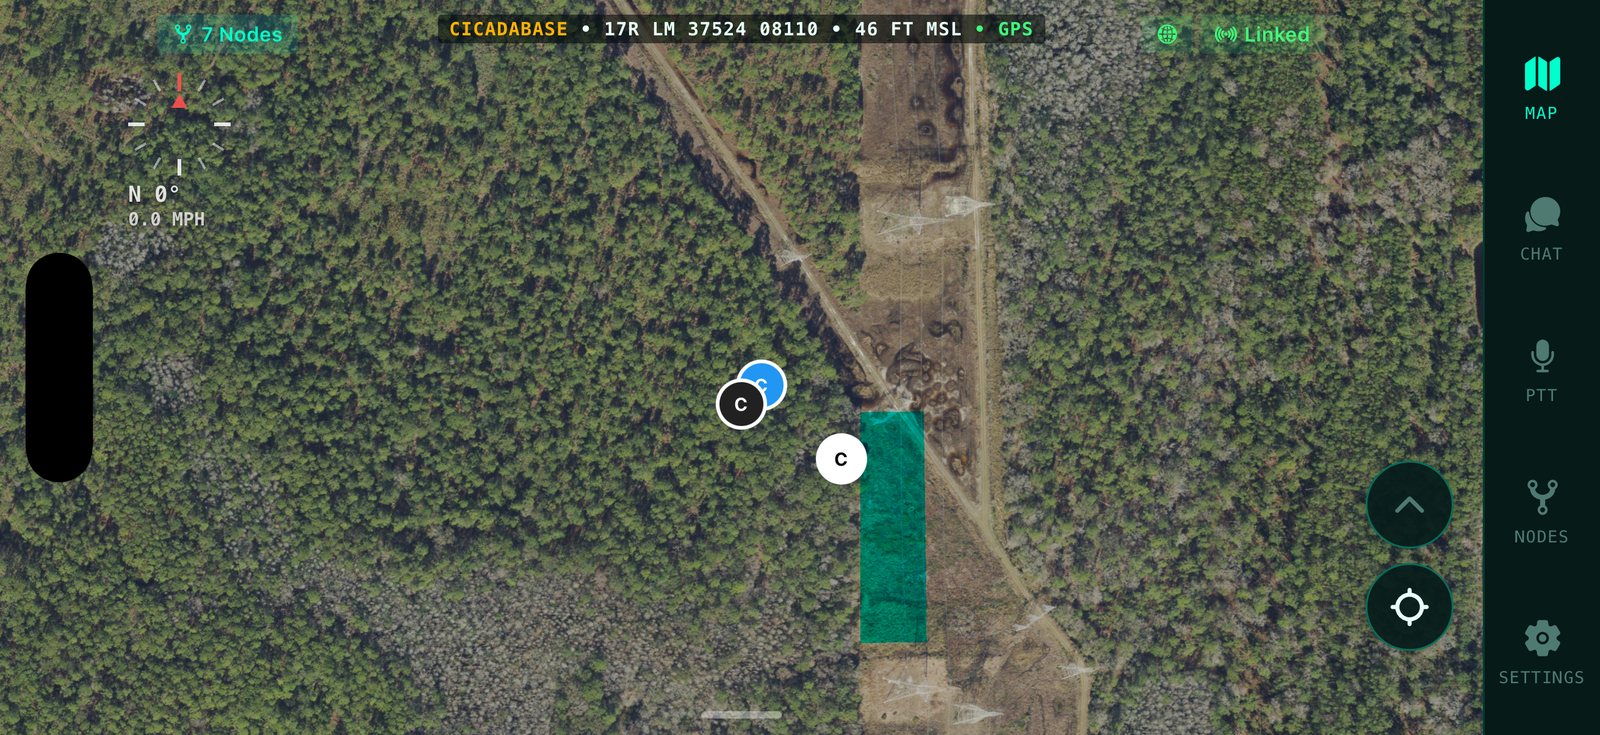
Watch the region outline: blue = overview complete, green = detail complete. Downloads resume where they left off — already-cached tiles are skipped instantly.
Caveats. On a US node the in-app downloader fetches satellite imagery (USGS NAIP) — the street basemap renders when your phone has internet but can't be bulk-downloaded yet. The node offers the map source that covers its region and deliberately hides the others, because imagery services don't return an error outside their coverage — they return blank tiles, so a download would report success and leave you with an empty map. If you're operating somewhere the built-in source doesn't reach, the node can be pointed at any tile service you're entitled to use, and everything else works unchanged. Areas you never downloaded show dark when offline; that's the offline-first design, not a bug. A full-detail region runs ~14 GB, so a couple of AOs fit comfortably on a 64 GB card. Once tiles are on the node, every phone that connects gets them — teammates don't repeat the download. A faster internet connection will not speed this up. The USGS builds each tile on demand when we ask for it, and that render — not your bandwidth — is what takes the time; a node on gigabit fibre uses well under 1% of it during a download. Long downloads are normal and they resume where they left off, so leave it running and come back to it.
Settings → Map → Offline Maps → Select Download Area
Bring your own maps (.mbtiles and .kmz)
Already have imagery — an ATAK .mbtiles export, a .kmz overlay (ATAK GRG), a QGIS or MOBAC package, purchased tiles, a drone survey? You can load it straight onto the node instead of downloading. Two ways:
From your phone (newest app versions): Settings → Map → Offline Maps → Import Map File, pick the file, and it uploads to the node with a progress bar. On iPhone the CicadaTAK folder also appears in the Files app, so you can AirDrop or USB-copy a map file in first, then pick it from there.
From a laptop (fastest for big files): connect to the node — its WiFi, or the wired port — and browse to http://10.41.253.1:8080/import (over WiFi use the node's address, e.g. http://10.41.254.1:8080/import). Pick the file, give it a name, and upload.
Either way the node figures out what the file is and does the right thing with it. An .mbtiles becomes a base map layer — pick it from the map's layers button, same as switching to satellite. A .kmz with imagery (GroundOverlay/GRG) is converted into map tiles on the node. And a .kmz full of placemarks — a repeater directory, a camera map, any points-of-interest collection — becomes a toggleable overlay: turn it on under OVERLAYS in the layers panel and its points draw over whatever base map you're using; tap a point for its name and details. Point overlays are smart about size — the node stores the whole set (even hundreds of thousands of points) and sends your phone only what's in view, so big files stay fast. No internet is needed at any point, which also makes this the way to load maps for a region our built-in sources don't cover. One import serves the whole team, same as downloaded tiles. Multi-gigabyte files upload much faster over the wired port than over WiFi — the app warns you before starting a big one. Deleting an import (from the laptop page) frees its space on the node. Not supported yet, and the node says so plainly if you try: multi-level "super-overlay" KMZ pyramids, and paths/polygons inside a placemark file (its points import; the line work is skipped and counted).
No node? Put the maps on your phone
Everything above puts maps on the node. You can also load an .mbtiles onto the phone itself — no node, no WiFi, no internet, nothing to connect to. This is for the standalone tier: running the app with a Meshtastic device over Bluetooth, or just carrying the app somewhere our built-in map sources don't reach. Outside the continental US the downloader has nothing to offer you, so this is how you get a map at all.
Get the file onto your phone. On iPhone, drop it into the CicadaTAK folder — plug the phone into a Mac or PC and copy it in from Finder or iTunes/Apple Devices (the fast way for big files), AirDrop it, or use the Files app. On Android (the app update after 1.2.46), connect the phone to a computer and copy the file into Android/data/com.cicadatak.mobile/files/Maps, on the phone or on its memory card — the app makes that folder the first time it runs, and a file manager on the phone itself cannot reach it. Older apps have no Maps folder: pick the file with the picker instead, and it is unpacked.
In the app: Settings → Map → Offline Maps → the Phone Maps (No Node Needed) section. Files already sitting in the CicadaTAK folder (on Android, the app's Maps folder) are listed for you; otherwise use the picker to browse.
Tap the file. On iPhone you get a choice: Use in Place reads the map straight from the file where it sits — ready in a few seconds, and it takes no storage beyond the file itself, so even a 100 GB pack fits. Unpack is the older way: it copies every tile out into the app's cache, which is slow and needs as much space again, and is still there if you ever need it. On Android, a file in the app's Maps folder is used in place the same way (the app update after 1.2.46; older apps unpack every file); a file you pick from anywhere else is unpacked. Either way the new layer is selected automatically — open the map's layers button any time to switch between it and the others.
A map used in place is tied to its file: the .mbtiles stays where you put it and the app reads from it every time. Delete the file, or delete the app, and that map stops working (remove it from the Phone Maps list) — on Android, uninstalling the app deletes everything in its Maps folder, so keep the original on your computer, which is where a map pack should live anyway. On iPhone and on Android, removing the map from the Phone Maps list asks whether to keep the file or delete it with it. A pack file that no map uses has its own trash button, so a failed or unwanted pack can go without a computer. With the memory card out, Android can only remove the map: delete the file from the Maps folder on a computer, or put the card back and use the pack’s trash button.
Phone maps are yours alone — this is the one thing to understand. A map imported to the node serves everyone who connects to it; import once, the whole team has it. A map imported to your phone lives on that phone only. Teammates each need their own copy of the file. If you're kitting out a team for an area, importing to the node is the one that scales — put it on phones when there's no node in the picture.
Phone maps use your phone's storage rather than the node's SD card, so mind the size of what you load — and deleting a map from that same screen gives the space back (for a map used in place, only when you delete its file too). They keep working with the phone in airplane mode and after a force-quit, which is the point of them. Zooming past the detail actually in the file gives you scaled-up imagery rather than a blank screen, so you always have something under you. And they stay available when you later connect to a node — a node's own map list is added alongside yours, not swapped in over it.
Getting an .mbtiles
Not all map downloads come in this format, but nearly everything converts to it with free tools: ATAK exports .mbtiles directly. QGIS has a built-in "Generate XYZ tiles (MBTiles)" tool (Processing Toolbox) that turns any layer — including a GeoTIFF from a drone survey or purchased imagery — into one. Mobile Atlas Creator (MOBAC) makes them from many online sources: just choose MBTiles as the atlas format before creating. If someone hands you a .gpkg (GeoPackage) or a GeoTIFF, run it through QGIS's tool first — a one-time step on a laptop. Support for importing GeoPackage and GeoTIFF directly is planned; .mbtiles and .kmz are what the node accepts today.
05The map
Everything on the Map tab is live mesh state: every node's position in its color, breadcrumb trails, and the tools below. Tap a teammate's dot to select them — you get corner brackets, a dashed navigation line, and a distance/bearing readout; rotate to landscape for a compass-first navigation layout.
Markers
Long-press and the marker is down — no form. It takes the type and color you used last and names itself the ATAK way (P.21.143205: type, day, time), with the name shown under it on the map. A slim card docks with a palette (one row, or two on a narrower phone): tap a type or the color dot to restyle it in place, tap the name to rename, the trash to remove it. Tap any existing marker for the same card — Go To sets it as your compass target. To move a marker, press and hold it, then drag it (the app update after 1.2.41): the new spot reaches the team like a rename does, over LoRa too. A long press on empty map still drops a new one. A Meshtastic waypoint locked by the radio that placed it stays put — only its owner can move it. Markers sync across the team the moment they're placed. A marker placed through a node now lives 24 hours (node firmware 0.22.0+ with app 1.2.46+; before this a marker placed through a node stayed until someone deleted it). The card’s Lifetime row shows how long it has left and offers 1 h / 6 h / 24 h / 7 days / Never — tap one to set it, or change it later — and the choice reaches the team, and the LoRa radios, with the marker. On a node running older firmware the row is read-only and the choices are hidden. A marker placed phone-direct through a Meshtastic radio keeps the radios’ fixed 24 hours. Who has this marker? The palette gains a people chip with a count such as 3/4 (node firmware 0.23.0 with the app update after 1.2.46): how many teammates in range your node can prove hold the marker as you see it now. Tap it for the Shared with list — Has it; Not confirmed yet (no word yet, which is not a no — give it half a minute); Out of range. Gets it when back in range.; Can’t confirm. Update CicadaRed’s software to see this. (with that teammate’s own name) Edit the marker and the count starts over for the new version. The chip is hidden when you are phone-direct (there is no node to ask) and on a node running older firmware; if the list says it couldn’t load, check that the phone is connected to your node.
Measure & Routes
Tap Measure, tap points, then the green ✓ — the line stays on the map and a slim card docks with total distance and bearing. To build a keeper straight away, use the route button next to Measure: draw your points, hit ✓, and it jumps right to naming. Save Route does the same from a measured line; saved routes get a Go To too. Routes are shared with your team (node firmware 0.23.0 with the app update after 1.2.46): a route you draw, or a measurement you save as a route, reaches every teammate through the nodes, and so do renames, colour changes, moved points and deletes; a teammate who was out of range gets it when they reconnect. A teammate’s route says who drew it (By <callsign> in its details). Routes already on your phone are shared once, with no duplicates, the first time you connect to a node that can share them. Once shared, a route lives on the nodes: away from your node it leaves your map and comes back when you reconnect. A Meshtastic radio doesn’t carry routes. With no node, a Meshtastic radio only, or a node on older firmware, a route stays on your phone and its details say so; it is shared the next time you connect to a node that can. A route can have up to 200 points: the app tells you when you reach that, and an existing longer route stays on your phone and says why — nothing is ever cut short. A measurement on its own is not shared, only a route. A route’s details say where it stands: Shared with the team. (your node hears at least one teammate right now), Saved on your node. Teammates get it when they’re in range., Sending to the team., or Not sent yet: your node didn’t answer. It keeps trying while you’re connected. If you and a teammate change the same route one after the other, both changes are kept — your moved point and their rename, say; if you both move points, the later move wins. Change it at almost the same moment from two different nodes, though, and only one version may be kept, whole. If a teammate deletes a route while your change to it is still on its way, the app says so (Route deleted) and offers Keep my copy, which saves your version as a new route and shares it. The other way round, deleting a route a teammate has changed since you last saw it asks first, once their change has reached your node (Route changed, naming who changed it): Delete anyway deletes their newer version too, and Cancel keeps the route with their change. If their change reaches your node only after you delete, their changed route comes back; delete it again if you still want it gone. Rarely, a route’s details say This change wasn’t shared: your node couldn’t accept it. Make any new change to this route, such as renaming it or moving a point, and both changes are shared. — repeating the same change does nothing; a different one shares both. The same happens to two groups that both edit a route while out of range of each other: when they reconnect, one group’s version is kept and the other’s edits to it are lost — points are never merged. A deleted route stays deleted for everyone, even on a node that was away for months.
Geofences
Draw circles or polygons with entry/exit alerts (a polygon alerts from node firmware 0.23.0; on older firmware only circles do) — every drawing bar has a red ✕ to cancel and a green ✓ to finish (on Android, the back button also exits a drawing mode). Alert history lives in Settings → Alerts & Sound → Geofences (last 100 events); Clear history stays cleared, even when the phone reconnects, and the toggle below it, Vibrate on alert, makes the phone vibrate (alerts play no sound). Geofence alerts on the phone are off until you turn them on there (the app update after 1.2.46 switches them off once, for everyone). From node firmware 0.23.0 each crossing alerts once: the node that owns that person's position (their own node, or the node their ATAK phone or radio is attached to) decides it, and every phone hears that one alert. A fence's edge has a small dead zone (at least 10 m, wider when the position is unsure), so standing on the line does not flicker; the same alert for the same person repeats at most once a minute; and drawing a new fence around people already inside raises nothing. With a very small fence and a poor GPS fix an alert can come late — size fences generously. If a teammate's node is out of reach when they cross, or keeps dropping in and out at the edge of range, their alert still arrives once the nodes can hear each other again (alerts from up to 10 minutes back).
Mesh health overlay
Toggle to draw the radio links between nodes, colored by throughput: green above 5 Mbps, orange 2–5, red below 2. Tap a link line for its detail card (throughput, or SNR for LoRa links). A globe icon means the mesh has an internet uplink. From firmware 0.23.0 a HaLow link's number is what it actually delivers (its rate times the share of frames that get through), so links read lower than on older firmware, and a link that has stopped working shows 0.1 Mbps in red instead of its last speed.
Moving dots glide
A teammate on the move — on foot, in a vehicle, in the air — travels smoothly across the map between position reports instead of jumping from point to point, and the locate button's follow mode keeps the map on you as you drive — and pointed the way you're going when Settings → Map → Track-Up Mode is on. While it follows, the map is still yours to glance at: pinch to zoom and it keeps following at the new zoom; twist it with two fingers and it springs back to north-up or track-up when you let go; drag it and follow turns off until you tap locate again. Tapping a teammate or a marker and long-pressing to drop one all work while it follows. With follow off the map stays wherever you put it and your dot moves across it — it can leave the screen, which is how you know follow is off; with Track-Up Mode on the map keeps turning with your heading until you twist it yourself. (Follow and track-up used to swallow your taps, drags and long-presses while the map was moving; fixed in the app after 1.2.46.) Needs firmware 0.16.0+ on the nodes and app 1.2.27+: earlier firmware reported every node's speed as zero, which is why dots used to step. A node that stops at a light keeps reporting at the faster cadence for ten minutes, so pulling away again shows up right away. A teammate heard only over LoRa doesn’t glide (node firmware 0.23.0): a LoRa position carries no speed or heading, so their dot moves with each report and has no direction. Before, such a dot reached ATAK as parked and facing north however they were moving, and a dot moved by a LoRa report could glide on along an old course.
Grey dots = last known position
A teammate's dot turns grey and hollow with an age label ("2m") when their position stops being current — they've moved out of radio range, a relay dropped, or their GPS lost sky. The dot stays where they were last seen rather than vanishing, because "here two minutes ago" beats no information at all. It goes solid again the moment a fresh position arrives, and disappears entirely after 10 minutes of silence. A selected teammate stays selected while grey, and the navigation line reads 2m OLD so you always know what you're steering by. The Nodes tab shows a matching STALE badge.
Rotate to landscape for the navigation layout — compass, status line, side rail
In landscape the compass rose reads true north and stays correct however the phone is rotated. In both orientations the layers button (satellite / street map / hybrid, and any overlays) sits right next to the tools chevron. Its panel opens upward from there and always keeps its title and ✕ in view, at any text size; when there are more layers and overlays than fit, the list scrolls under the title. Tap anywhere outside the open panel to close it — that tap only closes it, so it never drops a marker or adds a point to a route you're drawing.
Chat, PTT and Nodes open over the map
Press CHAT, PTT or NODES and that screen slides in over the map — halfway, so you keep the picture. Press the same button again to put it away. In landscape it comes from the right edge; in portrait it rises from the bottom. The chevron on its leading edge opens it the rest of the way, or drag the chevron to size it; drag it shut to close. Start typing and it opens fully on its own, then goes back to half when the keyboard drops. Touching the map puts the panel away — keyboard too, if it's up: reaching for the map means you're done with the panel.
You never leave the map to send a message. SETTINGS is the one button that still takes over the whole screen — it's configuration, not something you do while watching the map — and MAP closes whatever is open.
Alerts when the app isn't in front of you
Mesh Alerts (Settings, on by default) raises a normal phone notification for a new message or a new marker while you're in another app. Tap it and you land on the right chat channel. Nothing is announced twice — while the app is open and in front of you, you get the on-screen toast instead.
On Android the app keeps a quiet permanent notification while it's in the background. That notification is what holds the connection to your node open — Android stops an app that has none, and you'd miss the alert it was meant to deliver. Dismissing it stops background alerts until you reopen the app.
iPhone, for now. Alerts arrive while the app is open or freshly backgrounded. Once iOS suspends the app the connection stops and alerts stop with it, until you bring the app back up. Android is the one that keeps listening with the screen off.
The top bar tells you which node you're on
In portrait the header reads ⌗ N • GPS on the left (N is the number of nodes in your mesh), your node's callsign in the middle (in that node's map color), and uplink / AP / battery on the right — the same set the landscape status line carries, so nothing changes when you rotate. While your node is out of mesh range (node firmware 0.23.0+ with the app update after 1.2.46), the first field of the landscape status line turns red and reads OUT OF MESH RANGE (or NO MESH when the line is narrow) in place of the node count, and the line gets a red edge — tap it for the full warning; the count comes back once a teammate is heard again. In portrait the node count at the top-left does the same, reading NO MESH in red. It says STANDALONE in amber when you aren't attached to a node. A small phone icon beside GPS, in either orientation, means your phone is supplying the position, not the node. Tap AP when it's amber to retry the connection. An amber ⚠ with a count beside the callsign (node firmware 0.22.0+ with app 1.2.46+) means the node is reporting a problem with itself. Tap it and This Node opens with the warnings at the top, each one saying what is wrong and what to do; they clear by themselves when the node recovers. The ones a node can raise, in its own words: LoRa radio reconnecting — the node lost contact with its LoRa radio and is reconnecting; it usually recovers within a couple of minutes, else unplug the radio and plug it back in, or restart the node. LoRa radio backed up — the radio has no room to send, so long-range messages and positions from this node aren’t going out; usually clears by itself, else restart the node. LoRa radio not responding — the radio hasn’t answered for some minutes (other nodes may still hear it, so everything can look fine from elsewhere); the node is already trying to reset it, else replug the radio or restart the node. LoRa radio keeps disconnecting — the radio itself is fine; its USB cable or port is loose or failing, so reseat the cable or try another cable or port (from node firmware 0.23.0, drops caused by a USB power overload don’t count here, since that has its own warning; from node firmware 0.22.0 this watches only the node’s own radio, so plugging guest radios in and out no longer trips it). LoRa radio keeps losing power (node firmware 0.23.0) — the radio keeps restarting before it can run, so LoRa is down; its power is the problem, not its firmware, and the node can’t fix this one by itself. Check the radio’s USB cable and both of its plugs, then try a different cable or port; if the radio has its own battery, charge it or disconnect it. LoRa radio keeps restarting, LoRa radio has not said who it is or LoRa radio did not take its settings (node firmware 0.23.0) — the radio is connected but is not behaving like a working one, so the team may not see this node over LoRa. Restart the node from the app (Settings → This Node → Reboot Node); if the warning comes back, unplug the radio and plug it back in, then try a different USB cable and port. A radio that keeps restarting points straight at its power. LoRa radio lost power (node firmware 0.23.0) — the same signs, when the node’s USB ports were overloaded (USB power overload, below): the radio and its cable are fine, so the fix is the overload’s, and the warning gives it. While the overload warning is showing, this one is left out, so you see one answer for one cause; a LoRa radio that still misbehaves after the trip gets its own warning as usual. A MeshCore radio has three of its own: LoRa radio on the wrong frequency — it did not take the frequency the node gave it, so the node stopped sending over LoRa rather than transmit outside its plan (the mesh is not affected): restart the node, then replug the radio, and replace it if this keeps happening; LoRa radio not keeping its settings — it forgot its frequency when it restarted, and the node set it again so LoRa works, but it will forget again: switch the node’s LoRa protocol to Meshtastic and back to MeshCore (Settings → Radios → LoRa) to reinstall its firmware — a few minutes with LoRa off the air — and replace the radio if it still forgets; LoRa radio did not keep a setting — it lost its transmit power, the team’s channel key, its name or its location setting, so LoRa works but may not reach the team as it should: restart the node, replug the radio, and if the team’s LoRa chat stays silent, set the team passphrase again. 2.4 GHz mesh link down — the 2.4 GHz radio is plugged in but hasn’t joined the mesh (raised only when a dongle is actually present and enabled, never on a node without one, and held back while a USB power overload is showing); the warning carries a one-tap Restart 2.4 GHz radio, which is the same as Settings → Radios → 2.4 GHz → Disable, confirm, then Enable 2.4 GHz Mesh, and restarting the node also fixes it. 2.4 GHz mesh radio can’t hear anything (node firmware 0.23.0) — the 2.4 GHz radio is on but has heard nothing for over ten minutes, not even the node’s own Wi-Fi beside it; a node that is simply alone on 2.4 GHz is never told this. The same one-tap restart is the first step; if it still hears nothing, the radio is faulty and needs replacing. <Teammate>’s LoRa radio isn’t linked — that teammate may show up twice on the map: their LoRa radio is on the air but their node isn’t using it; on their node, replug the radio or restart it. From node firmware 0.23.0 it appears only about five minutes after their LoRa went quiet, so their restart, update or LoRa settings change doesn’t raise it (§09). From node firmware 0.23.0 a node also watches for two problems with the team itself, which nothing showed before. Another node has this node’s address (or, seen from a third node, Two nodes have the same address) — two nodes were given the same mesh address by chance, so messages, positions and updates for one can reach the other or go missing; nothing is broken on either node. Tap Give this node a new address on one of the two: it restarts on a new address within a couple of minutes and the warning clears on both. Another node has this node’s name (or Two nodes have the same name) — the map and chat treat the two as one node, and phones see two WiFi networks with one name. With the app update after 1.2.46, rename one of them (Settings → This Node → Node Configuration → Node name → Rename, §13): it restarts once and stays on the team. The warning’s own button, Run setup again, also works, but that node restarts into setup and is off the team until setup is finished on it (join its CicadaTak-XXXX network). This node lost its identity — its saved identity could not be read, so other devices can’t confirm it is the same node they knew; messages, positions and the mesh keep working. Restart the node; if the warning comes back, tap Run setup again: the node gets a new identity, and phones that trusted the old one ask you to trust it again. Node storage failed (node firmware 0.23.0) — the node’s storage could not be opened, so it started from memory: it works, but anything changed now is lost when it restarts. Go to Settings → This Node → Node Firmware and tap Reinstall this version, or install the update if one is offered — either rebuilds the storage and keeps the settings; if it happens again, replace the SD card. This node is sending every broadcast twice (node firmware 0.23.0) — its mesh relay setting keeps turning back on, so the radio repeats every broadcast and uses about twice the airtime the team shares. Restart the node; if the warning comes back after a restart, reflash it with the current firmware (§13). Wired connection has no address — a cable is plugged in but nothing on the other end gave the node an address; see wired connections in §13. USB power overload (node firmware 0.23.0+) — the node’s USB ports briefly could not power the LoRa radio and the 2.4 GHz mesh radio together, and both lost power. The LoRa radio reconnects by itself, and the node restarts the 2.4 GHz mesh link once and says so — and says when it has stopped retrying, because a second try is a loop on a node with this fault. If your LoRa radio is a Heltec V4, it can’t run beside the 2.4 GHz mesh radio on a node: use a Heltec V3 instead, or unplug the 2.4 GHz mesh radio and run on LoRa and HaLow only. With any other LoRa radio, unplug the 2.4 GHz mesh radio if this keeps happening. Restarting the node brings both radios back. While this warning shows, the node doesn’t also tell you to restart the 2.4 GHz radio or reseat the LoRa radio’s cable: the power overload is the cause of both. Once the node has stopped retrying, this warning stays up until the node restarts, for as long as the 2.4 GHz mesh link is down, so it never hands you the 2.4 GHz restart button that would trip the ports again. Power supply can't keep up (node firmware 0.23.0+) — the power reaching the node itself dipped below the safe level, either right now or at some point since it started. When that happens the radios lose power for an instant, and a LoRa radio can go quiet while still looking connected, which is easy to mistake for a faulty radio. If the node runs on a battery, charge it or swap the pack and reseat the battery’s cable — on a body-worn node that is the usual cause. On wall or vehicle power, try a different supply and a shorter, thicker cable. It clears when the node restarts. Running hot (node firmware 0.23.0+) — the node has reached its temperature limit and is slowing itself down to protect its hardware, so links and updates may be slower until it cools. Nothing to do: it recovers on its own as it cools, and the warning clears with it. Out of mesh range (node firmware 0.23.0+) — no other CicadaTAK node has been heard for over 45 seconds, so your messages and position are not reaching the team over the mesh; move back toward your team or to higher ground. While the app is open, your phone also vibrates once when this appears, about 45–80 seconds after the last teammate went quiet, and not again until you have been back in range; it follows Settings → Alerts & Sound → Mesh Alerts. It cannot alert you while the app is closed. If a warning shows no button, update the CicadaTAK app, or update that node. None of these is about the HaLow radio itself.
06Chat & photos
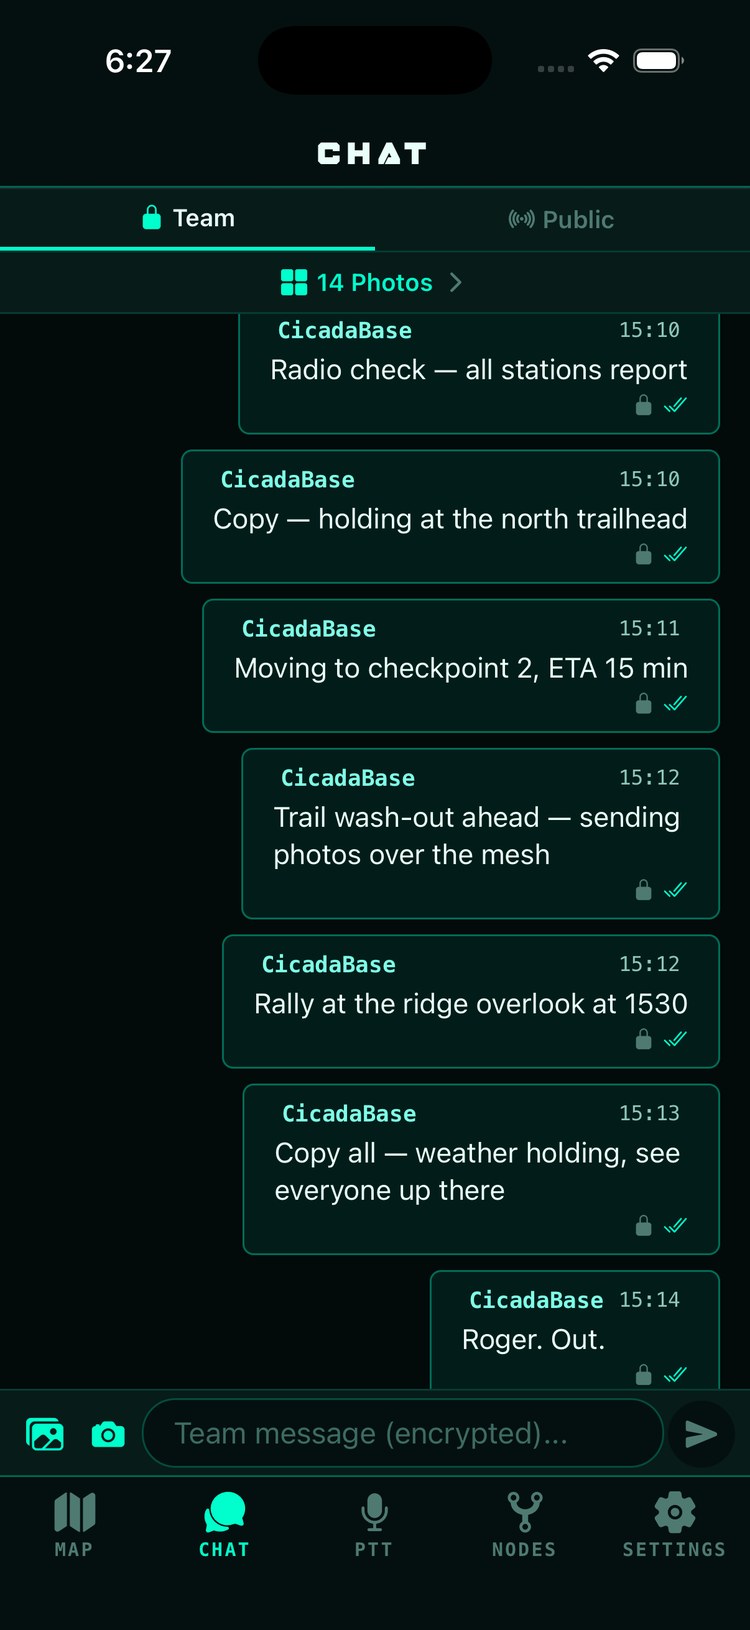
Two channels in the Chat panel (§05 — it slides over the map, it doesn't replace it): Team is end-to-end encrypted with your team key; Public rides the open Meshtastic channel so ordinary Meshtastic users can participate (see §09 for when that channel exists). One gray check = your node accepted the message; blue double-check = a teammate’s node received it.
The double-check tells you more (node firmware 0.23.0 with the app update after 1.2.46): beside it is the radio your message left your node on — HaLow or 2.4 GHz — and, when it went to more than one teammate, a count such as 3/5: three of the five it was sent to have it. Press and hold the message for the Delivery sheet — who has it, over which radio and how long it took (Red · HaLow · 0.4 s), then who is still waiting (Amber · Not yet). Nobody confirmed yet? Anyone out of range gets it automatically when they come back — don’t resend. On a node running older firmware the checks work as before and the sheet says to update the node to see the rest. Photos work the same way: the check fills, with the same count and the same sheet, as each teammate’s node finishes downloading the photo — so it comes a little later than for a message. A teammate whose node is older than firmware 0.23.0 stays Not yet on a photo.
A message is at most 127 characters (node firmware 0.23.0 with the app update after 1.2.46; an emoji counts as several). That is the most a LoRa radio can carry in one line once your callsign is on the front — before this a longer message reached the teammates on HaLow and silently missed everyone on LoRa. The composer shows how many characters are left once you are within the last twenty, and stops at the limit: send the rest as a second message. Quick messages are at most 100. An older app can still type past it; the node then refuses the send and tells you so in the chat itself, and nothing goes out anywhere.
Away from your node, the app shows nothing of the team’s. When your phone has not reached your node for about half a minute — you walked away from it, or it is switched off — the chat, your teammates’ positions and trails, the markers and the photos disappear from the app, and Settings → Team no longer offers Share QR. Your saved routes and your own pins are hidden, not deleted, and your offline maps stay. Nothing is lost: the chat and everything else are kept on your node and come back within a second or two of reconnecting, and a message you sent in the gap is still delivered. This is so a phone left lying around, or picked up by someone else, has nothing of the team to show. (If you pair the app straight to a Meshtastic radio instead of a node, your phone is where your chat lives, so it stays.)
Clearing chat for the whole team (Settings → Team → Clear Fleet Data): every node in range drops its chat at once, and teammates’ phones show Chat was cleared for the whole team. once — the phone that pressed Clear isn’t told about its own clear. A node that was out of range drops the same messages the moment it rejoins (node firmware 0.23.0); what it wrote while it was away, and anything written after the clear, stays. Only photos come back: a node that was off during a clear re-shares the team’s photos when it returns, so clear with everyone up if you want the pictures gone too.
Photos go team-only: the app compresses before sending (about 800 px), the timeline shows thumbnails, and tapping opens a full-screen viewer. Nothing gets cropped: pick a photo, add a caption, send. The camera button opens a camera inside the app — what you see in it is exactly the photo that is sent, and one tap takes you straight to the caption. Turned sideways, the caption box and Send sit beside the photo, so nothing needs scrolling to reach them.
Caveat. Photos travel over the HaLow mesh only — they're far too big for LoRa. A teammate reachable only via LoRa (see hop badges, §08) gets your text but not your pictures.
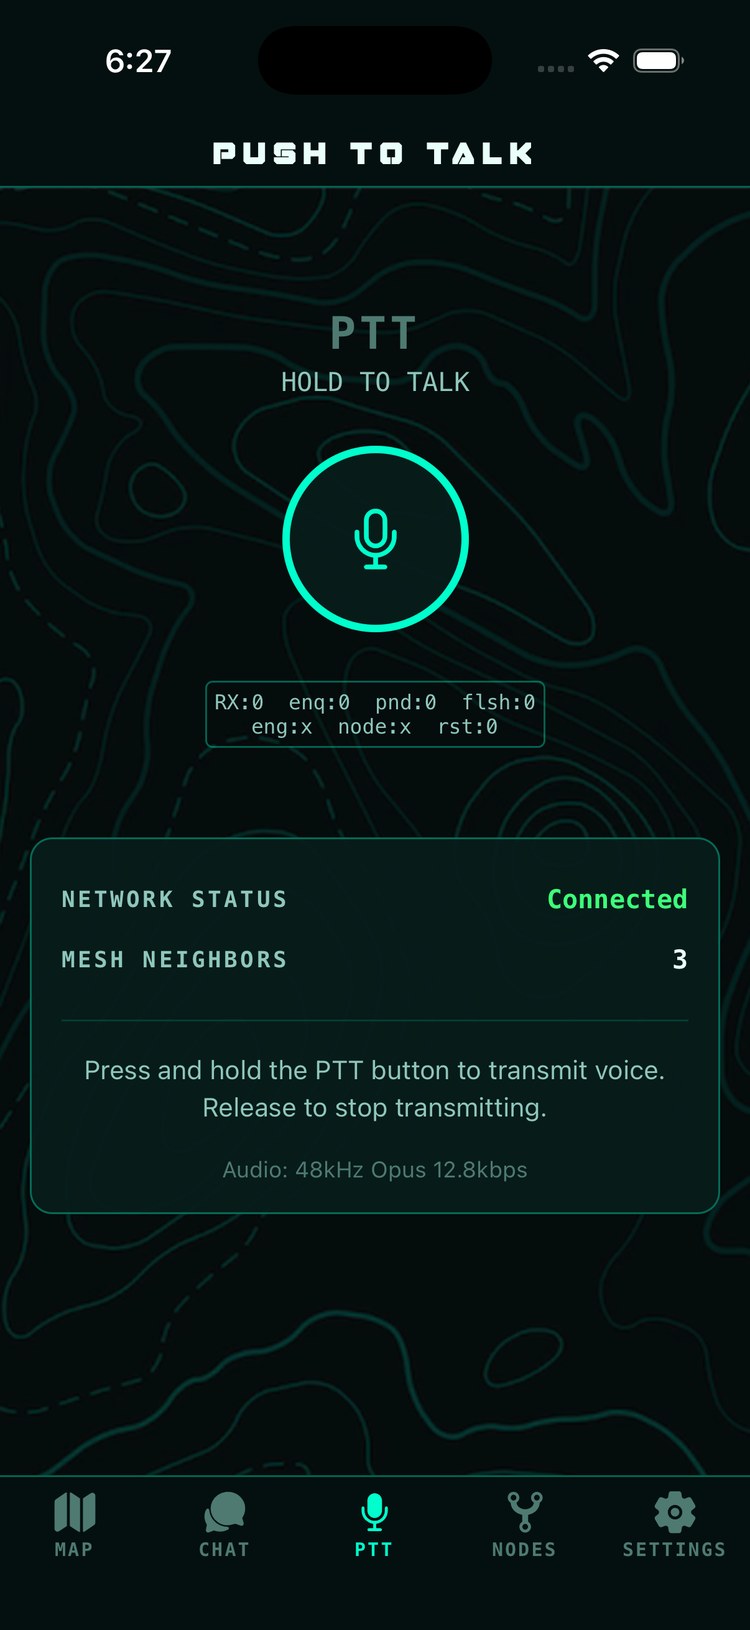
Team chat — locks and delivery checksPTT — hold to talk
07PTT voice
PTT is a radio: press and hold the big button to talk, release to stop. Audio is live-streamed voice with forward error correction, tuned for the mesh. Finger drift while transmitting won't drop your press — the button is deliberately forgiving.
A wired handset can be plugged in at any time (firmware 0.15.0+). If you use a USB PTT handset or headset on the node's own USB port, the node notices it within a few seconds and starts using it — no restart, no reboot, nothing to configure. Unplug it and the node goes back to the app. On firmware 0.14.0 and earlier the node only looks for a handset when it starts up, so one plugged in later is simply never seen, with no error to explain it — plug the handset in first and then power the node on, or reboot the node once after plugging it in.
To actually hear anything in the handset, switch Settings → Voice to "Handset". Out of the box, incoming voice plays on your phone — so a handset you've just plugged in will transmit fine and stay silent on receive until you change this. The two are deliberately exclusive: "Handset" also mutes the phone, so the same transmission never arrives twice. Switch it back to "Phone" when you unplug the handset — left on "Handset" with nothing plugged in, neither the phone nor the node has anywhere to play incoming voice, and PTT receive will seem broken.
A USB PTT button plugged into the phone is not a PTT button. Accessories of this kind work as a microphone and earpiece when plugged straight into a phone, but iOS gives apps no way to read their button as a held press, so you still key using the on-screen PTT. Plug the same accessory into the node and its button works properly as press-and-hold.
Caveats. PTT is foreground-only on both iOS and Android: keep the app open and the screen on to hear traffic (the app holds the screen awake for you). A backgrounded or screen-off phone will miss transmissions on either platform — background voice is built for Android but is switched off in the shipped app, so don't rely on it. Also make sure you've allowed the app microphone access, or the PTT button will refuse to transmit. Voice never bridges over LoRa — it's HaLow-mesh only.
08Nodes & mesh health
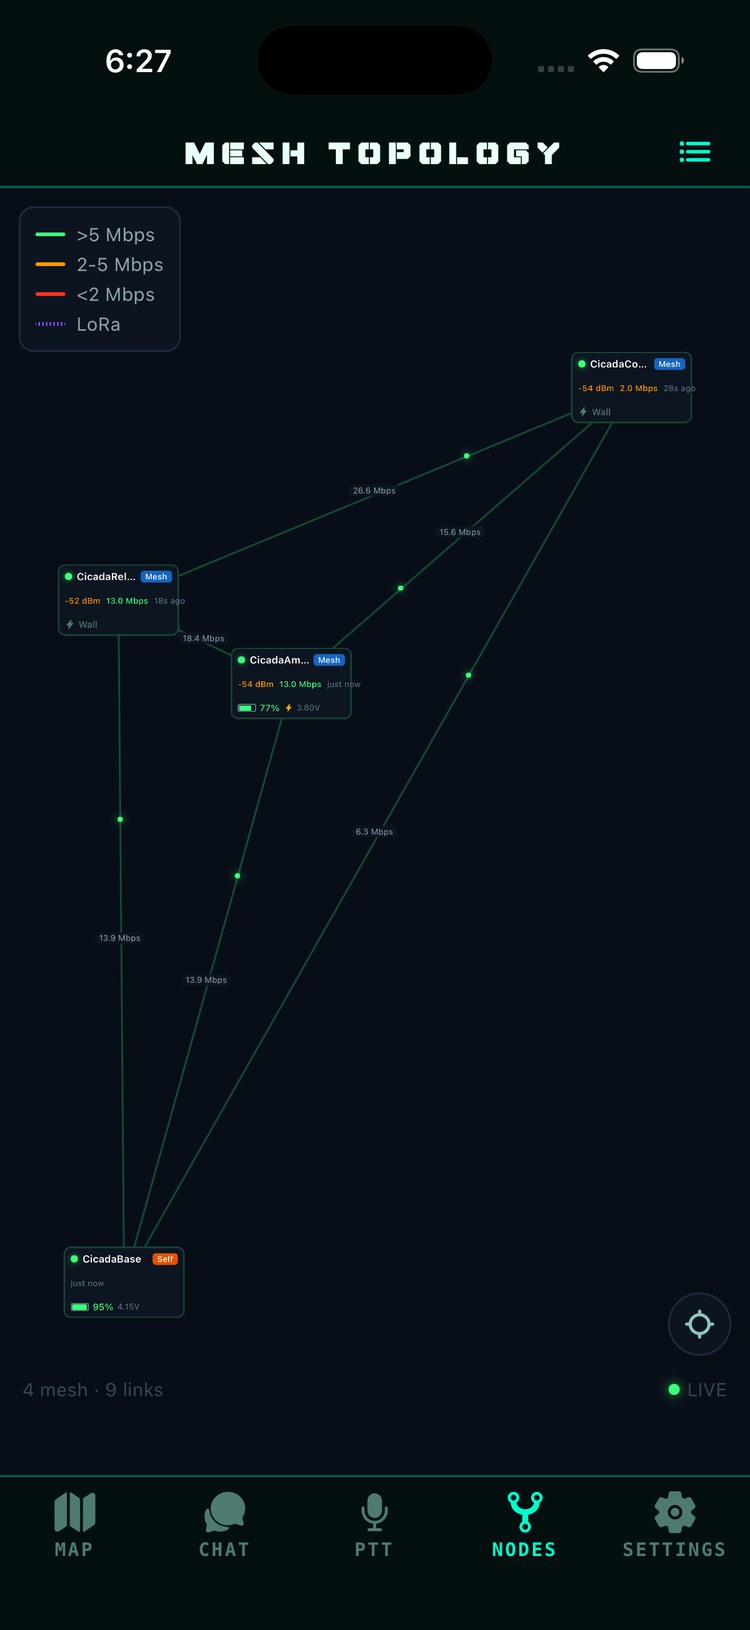
The Nodes panel has two views — toggle with the icon in its title row. List shows each node's callsign, signal, battery and hardware state (GPS and LoRa status icons — a green phone icon in place of the GPS icon means that node's position is coming from its operator's phone, not its own GPS module); tap a node and hit Ping Node for round-trip time, a throughput estimate, and the route it took ("direct" or "via …"). Topology draws the live mesh as a graph, GPS-positioned, links colored by throughput, LoRa links dotted purple. A node the mesh has stopped hearing stays on it greyed out, with a hollow dot and last heard 2h ago (or however long it has been) in place of its signal — the same way the map greys out a teammate it has lost. While you are out of mesh range, the list and the graph show only you and any radio you can still reach over LoRa — and if nothing is heard on any radio, just you, with a line saying you're out of range. Teammates come back as soon as one is heard. A signal number is shown only for a teammate your node is hearing directly right now.
Orange 1h / 2h / 3h badges mark nodes reached over LoRa and how many hops away they are. The internet-providing node wears a GATEWAY badge.
Topology view — live links with throughput
09LoRa protocol & modes
Nodes with a LoRa radio extend the mesh by kilometers for positions and text when teammates are beyond HaLow range. Three decisions live in Settings, read top-down: the protocol (which LoRa world your radio speaks), the mode (how visible it is inside that world), and the community preset (which Meshtastic radio setting it runs in Open and Covert).
Making LoRa quiet (node firmware 0.23.0 with the app update after 1.2.46): the LoRa Radio card at the top of Settings → Radios → LoRa has Make LoRa Quiet. Use it for radio silence, or to keep a node to HaLow only: the radio stops transmitting, the node ignores what it hears, and teammates do not see it over LoRa. HaLow is not affected. It does not cool the node: the radio stays powered and still warms it, so to remove its heat, unplug the radio. The card reads QUIET, and LoRa stays quiet through restarts and updates until you tap Turn LoRa On; the radio is back within a minute. If the node cannot confirm the radio has gone silent (a radio that is not this node's own, say), the card says so and what to do. A radio plugged in or swapped while LoRa is quiet may transmit for up to about half a minute, plus the time to connect to it, before the node silences it. While LoRa is quiet, the LoRa page says so above the mode choices; a mode or preset you pick is saved and goes on the radio when you turn it back on, and installing LoRa firmware or switching protocol asks you to turn it on first. The card appears only on a node that runs Meshtastic with its own radio: MeshCore radios have no way to stop transmitting.
“LoRa radio may not be transmitting” / “LoRa radio is not transmitting” (node firmware 0.23.0): LoRa is on, but the node could not confirm the radio is transmitting, or the radio did not take the node's change and is set not to transmit, so teammates may not hear this node over LoRa. Wait a minute while the node reconnects; if it stays, unplug the LoRa radio and plug it back in, or restart the node. If either keeps coming back, replace the radio.
LoRa Protocol (firmware 0.9.0+, app 1.2.17+): Meshtastic — every node relays for everyone, and any Meshtastic device can appear on your map — or MeshCore — the newer community-mesh protocol where relaying is done by dedicated repeaters, so your radio rides existing public infrastructure without spending its own airtime. Switching reflashes the node's LoRa radio in place (about 2 minutes, the HaLow mesh is unaffected) and changes only the node you're connected to. The two protocols cannot hear each other on the air: your whole team must run the same one, and the Nodes panel shows a warning banner with per-node protocol chips the moment a mixed team is detected.
Mode defaults differ by protocol, on purpose. A Meshtastic node starts in Dark — private, isolated, best HaLow throughput; joining the public Meshtastic side is a deliberate step up to Covert or Open — and Open shares your radio's name and approximate position with everyone on it. A node that was in Open before the update to firmware 0.23.0 is set to Covert by the update, so nobody becomes visible without choosing it. With the app update after 1.2.46 the LoRa page says LoRa mode set to Covert until the node next restarts; choose Open again to be public. A MeshCore node starts in Open — being part of the public community mesh is the point of picking it. Switching protocols resets the mode to that protocol's default.
Mode
On Meshtastic
On MeshCore
Open
The public Meshtastic mesh sees you: your name, and your position within about 365 m — strangers see you update every few minutes while moving, about hourly when still. Your team still sees your exact position, and your team channel stays encrypted. Public devices appear on your map too. SAR, group events. Node firmware 0.23.0+: before it, Open behaved exactly like Covert.
The MeshCore default. Full community-mesh member on the standard US settings: public users' chat and positions on your map, your encrypted team channel relayed for free by community repeaters.
Covert
You hear the public mesh, but your position goes to your team only — public nodes appear on your map, you don't appear on theirs. Public radios your radio hears may still learn its name: Meshtastic radios introduce themselves to a newcomer, and nothing turns that off.
Listen-only: you hear the whole public mesh — chat and positions — while transmitting nothing automatic at all. Sending a message is still your call.
Dark
The Meshtastic default. Team-only on a separate frequency — fully isolated, and the best HaLow throughput (see the caveat below).
Team-only on a private frequency — invisible to the community mesh.
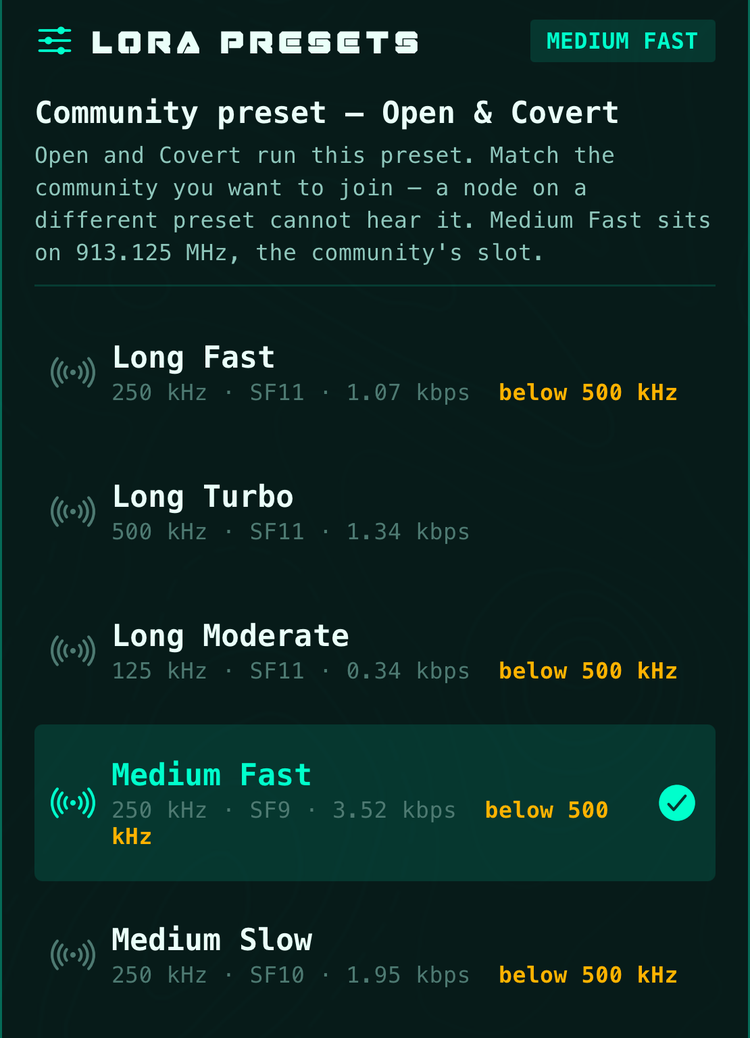
Community Preset (Meshtastic only): Open and Covert run whichever Meshtastic preset you pick — Long Fast (the default), Medium Fast, Short Turbo and the rest — so your node can join a local community that runs something other than Long Fast. A preset is radio-wide: your team channel rides the same one, so your whole team must match, exactly like the mode. The team QR carries your choice and the community's frequency slot, and scanning it sets a teammate's node — or a standalone radio scanned with the Meshtastic app — to both. A radio set up from a team QR in the Meshtastic app starts in Covert: it never shares its position publicly until someone picks Open. Scanning the QR in CicadaTAK takes the key and the preset and leaves the node’s or radio’s mode as it was. Your node sits on the community's published frequency for the preset (Medium Fast is 913.125 MHz in the US) and the card shows it. The list only offers what your node's LoRa radio can run — if the radio is not on the build your node carries, Long Turbo shows greyed out and the LoRa page offers Install Node's LoRa Firmware, a two-minute in-place install — and presets narrower than 500 kHz carry a below 500 kHz tag — a note about the US bandwidth rule, not a statement that any setting makes the radio certified. Dark has its own choice, the Dark preset: what your team's private channel runs in Dark — Long Fast (the default) or Long Turbo (500 kHz), on a private frequency chosen for that width. Both have their own Push to Entire Fleet, and both follow the same rule as the mode: the whole team matches, or the odd node out is deaf. Needs firmware 0.19.0+ on the nodes and app 1.2.28+: earlier builds hard-wired Long Fast, so a node could not join a community running Medium Fast. Released 2026-09-16 — update from the LoRa page or flash the current image.
Bringing a friend's radio onto the team (Meshtastic only): plug their Meshtastic radio into your node's USB port, open the LoRa page and, in the Radio Provisioning card at the bottom, tap Provision a Radio (called Provision a Guest Radio before app 1.2.40, where it sat in the LoRa Mode card). Pick the radio, give it a name, and under a minute later it walks away a team member — the team channel and key, the team's frequency, and its position reported every two minutes if the board has a GPS. From a node in Open, the radio is set to Covert (node firmware 0.23.0+): it is someone else's radio, so its position goes to the team only, and its owner chooses whether to be public. Bluetooth: from node firmware 0.23.0 a node's own LoRa radio has Bluetooth turned off, because nothing on the node uses it and, left on, a phone nearby could pair with it and read your team key; so the Meshtastic app cannot pair with a node's radio. A radio you provision here keeps Bluetooth on, so it pairs with its owner's phone, and a radio that was inside a node pairs with a phone again once it has been provisioned here. A teammate's radio that is only charging on your node keeps its Bluetooth. If the app says your node's LoRa radio can be paired nearby and it is your node's own radio (one added after setup, say), choose it under Choose This Node's Radio and the node turns its Bluetooth off. A board with no GPS module shows in the node list but never on the map (node firmware 0.22.0+; older nodes could draw such a radio at its previous owner’s last position). From node firmware 0.22.0 the node also announces the radio’s new name to the team the moment provisioning finishes, and the message says whether a nearby radio confirmed hearing it — before this, teammates could keep the radio’s old name for up to three hours. The node reboots the radio and reads every setting back before it says so; the message tells you how many matched, or exactly which setting did not stick. If the radio's firmware cannot run your team's preset — or it is a brand-new board that does not answer at all — it is refused before anything is written, and the app offers to install your node's LoRa firmware on it right there: one tap writes the node's Meshtastic build to that radio (your node's own radio stays up), waits for it to boot, and provisions it with the name you gave. A radio that sets up fine but runs a different firmware version from your node is offered the same install (with the next app update): the message names both versions, so you can bring it onto the version the rest of the team runs. Heltec V3 and V4 only on firmware before 0.23.0. From node firmware 0.23.0 (with the app update after 1.2.46) the offer is a list of the boards your node carries firmware for — Heltec V3, Heltec V4 and RAK4631 today: each row says whether it suits that radio, and if not, why, in the node’s own words. When the node is sure which board it is, that row is already ticked and Install is one tap; when it is not — a board it cannot identify, such as a LilyGO T-Deck that has never answered — nothing is ticked, and you pick the name printed on the board before Install will work. You are the source of truth about the board you are holding: when the radio cannot confirm your pick — a brand-new board has nothing to say — the app asks once, “We can’t confirm this radio is a Station G2. Are you sure it is?”, and installs on Yes; when the radio says it is a different board, the app warns you with the radio’s own claim and what happens if it is right — “That radio says it is a Heltec V4. If it really is, Station G2 firmware will stop it working. Are you sure it is a Station G2?” — because only you know whether the radio is a mis-flashed G2 (dead until repaired, and this repairs it) or a real V4 that the wrong firmware would break; Yes, I’m sure writes your pick, and the node refuses if the radio’s answer changed while you were reading. A radio that confirms your pick gets no question at all. An older app or a CicadaDeck cannot make that choice, so a 0.23.0 node offers them no install for such a radio — update the app to choose the board. A radio that has said what it is gets only its own firmware, or a plain explanation when your node carries none for it. A bar under the button shows how far along the job is — connecting, writing, rebooting, reading back, announcing the name, or the firmware install’s own percentage. If the radio simply did not answer, and your node knows it already runs Meshtastic (the node installed its firmware or heard it answer in the last half hour), the app no longer offers firmware again: it says the radio didn’t answer and to unplug it, plug it back in and try again. The name box also takes an optional short name (up to 4 characters) — its placeholder shows the short name the node would derive if you leave it empty — and the keyboard’s Next key moves you to it. The bar and the “didn’t answer” message need node firmware 0.22.0+ and the app update after 1.2.39, which also makes guest radios on the node’s USB-C port (a Heltec V4) connect reliably. The app tells you whether the node confirmed the board or only inferred it — it confirms only when the radio's USB name says which board it is, which a Heltec V3 never does and a V4 usually does not either. Read that line before you tap, and stop if the board in your hand is not the one named: a different board would get the wrong firmware. Re-sync Team Radios, the card's second button (Apply to USB Standalones before app 1.2.40), is the same job for several radios at once and keeps their names: use it after changing the team key or the LoRa mode, with the radios on a USB hub. Your node's own radio and its GPS are never in either list. Needs firmware 0.20.0+ and app 1.2.32+; on an older node the button says the firmware needs updating. The confirmed / inferred line, and the node refusing to write firmware to a board it cannot name, need firmware 0.21.0+ — on 0.20.0 the flash still picks a board by scanning. If your node ever shows LoRa as “detecting” and says it will not guess, two radios are plugged in and the node has not adopted one as its own yet — it refuses to pick, because the wrong pick would rename your friend's radio. Tap Choose This Node's Radio… and pick the board built into the node (each choice names its USB port), or just unplug the other one. The same button appears with just one board when the node has never been told that radio is its own (node firmware 0.23.0 with the app update after 1.2.46): until then the node leaves the radio's Bluetooth on, and its warning sends you here. If the radio is built into the node, choose it and the node turns its Bluetooth off (the radio restarts once); if it is a teammate's radio charging there, unplug it. Map markers travel over LoRa too (node firmware 0.20.0 and later): a marker you place reaches Meshtastic radios on your team channel as a waypoint, and a waypoint from a teammate's Meshtastic radio becomes a marker on your map. From node firmware 0.23.0 only your team channel can: a waypoint a stranger sends on the public channel never adds, moves or removes a marker on your team's map, and a stranger's direct message to your radio never lands in team chat, in any mode. Markers go out when they are placed or moved, not on a timer — LoRa is the slowest tier, and repeating unchanged markers would crowd out chat and positions. From node firmware 0.22.0 edits and deletes cross the LoRa tier too, in both directions; a marker’s colour and icon travel with it (app 1.2.33+ — a marker from an older node or app arrives as an orange pin, and orange also marks any waypoint made in a Meshtastic app); and a marker that came from a radio expires with its waypoint. From node firmware 0.23.0 an edit made on the HaLow side reaches the radios too: move, rename, retype or recolour a marker that arrived from a radio and every radio updates the waypoint it already holds instead of gaining a second one (on 0.22.0 only a delete went back; an edit stayed on the HaLow side). A node’s own radio keeps the node’s name (node firmware 0.22.0+): move the board to another node and it takes that node’s name on its own, and the rename reaches the rest of the mesh — nothing to type.
Out of HaLow range, still on the map over LoRa (node firmware 0.23.0): a teammate whose node has dropped off the HaLow mesh keeps coming through on their LoRa radio — their chat lands in the team channel under their own name, and their own dot keeps moving; there is no second dot for their radio. When the HaLow link returns, the copy that arrives over it is not shown again. Before 0.23.0 a node ignored a teammate’s radio for up to ten minutes after it last heard their node on HaLow, so the first ten minutes of a real separation carried nothing from them over LoRa. A radio merely named like a teammate is not theirs: only the radio a node actually owns can speak or move for that teammate, so a stranger’s board named CicadaAmber — or named like your own node — changes nothing on your map and is not shown at all.
Swapped a node’s LoRa radio? (node firmware 0.23.0) The old radio still carries that node’s name on the air, so instead of showing up as a second copy of the node it is listed as CicadaBench (not in use), and it drops off the list ten to twenty minutes after it is unplugged. Older firmware could list it as a second CicadaBench for up to three hours. The node list may cut the name short: tap the row to read it in full. If you give the old radio to someone, provision it with a new name first.
A teammate restarting no longer shows up twice (node firmware 0.23.0). When a teammate’s node restarts, updates or changes its LoRa settings, its LoRa radio goes quiet for a moment; every node now keeps that radio as theirs for two minutes, so their dot, their Nodes row and their ATAK contact stay single. If your own node restarted at the same moment — a whole-team update, say — it has nothing to keep, and a second copy can still appear for about a minute. A LoRa radio unplugged from a running node shows up again on its own: before, that node went on claiming the radio until it restarted, so the radio — and whoever carried it away — vanished from every map; now it is listed again within about two minutes.
Paired directly to a handheld radio? A standalone has one modem preset and no node to hold a separate Dark preset, so the card asks you to name your team's Dark preset once (Long Fast, or Long Turbo for a 500 kHz team) and then tells you whether the radio matches it. That setting is only ever used to decide what the card says — it never writes to the radio on its own. Nothing auto-switches when you enter Dark, deliberately: Long Fast and Long Turbo sit on different private frequencies, so guessing would put a radio off its own team while looking correct. In Open (the app update after 1.2.46), the app sends your exact position to your team while it is connected and allowed to use your phone’s location; with the app closed your team gets only the approximate public position, and only from a radio with its own GPS: about every 5 minutes while you move and hourly when you're still. If chat says team messages are paused, the app could not re-read the radio's settings after a change that didn't fully go through, so it won't send on LoRa rather than risk the wrong channel, and your messages show as not sent: disconnect and reconnect the radio in Settings → Connection, then send again.
Settings → Radios → LoRa → Community preset — the frequency is named, not derived (firmware 0.19.0+)
The card also tells you the truth about the hardware. No LoRa board on the node? It says so, and says the mode you picked is only a saved preference. Board attached but not answering — the usual sign of a brand-new, unflashed Heltec — and it says that instead, with a Flash Meshtastic Firmware button that writes the correct firmware in place (§13). A Heltec V4 works too: on node firmware 0.5.0 or newer the same button flashes it in place; on older firmware the card names the board and points you at the one-time computer flash it needs (§13). On a MeshCore-protocol node the flash button never appears — the protocol switch above is what rewrites the radio, and it refuses to write the wrong firmware family.
“Saved, but this node’s LoRa radio would not keep its new frequency setting” (node firmware 0.23.0), after you change the mode or a preset: the node gave the radio its new frequency twice and the radio lost it both times, so the node stopped sending it rather than keep restarting the radio. Your choice is saved but not in effect on this node. To try again, restart the node from the app (Settings → This Node → Reboot Node); if the message comes back, the radio may be faulty.
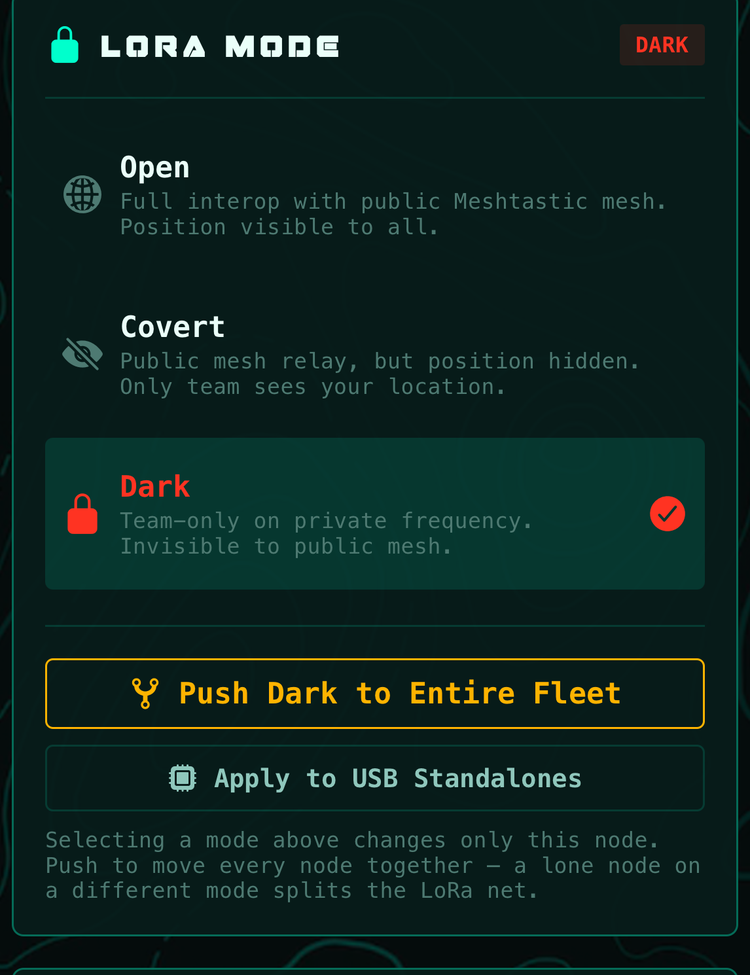
Caveats. The plain mode picker changes only the node you're connected to — use Push to Entire Fleet to move everyone at once, or you'll split the LoRa net without noticing (on Meshtastic a node in Dark can't hear one in Open or Covert any more than mismatched protocols can — Open and Covert share a frequency and still hear each other — and mismatched presets can't hear each other either; the Community Preset card has its own fleet push). On Meshtastic, Open and Covert cost real HaLow throughput: the LoRa radio's transmit bursts desense the HaLow radio beside it, roughly doubling retry rates versus Dark — that HaLow tax is why Dark is the default; flip up when you need public interop. What bridges over LoRa: text, positions, markers (Meshtastic) / text and positions (MeshCore). What doesn't: photos and voice.
Settings → Radios → LoRa → LoRa Mode — note the "changes only this node" fine print
10Fleetwide bandwidth
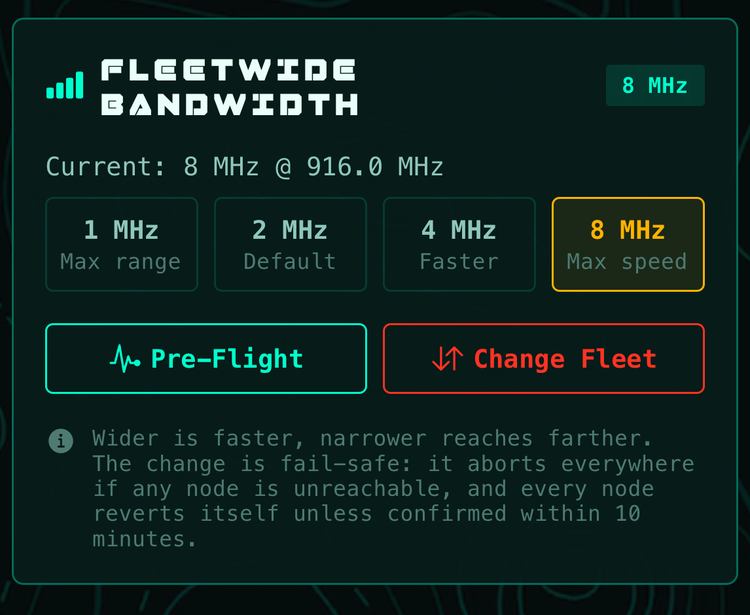
The HaLow mesh trades range against speed by channel width. The fleet ships at 4 MHz — the default since firmware 0.7.0 — and Settings → Radios → Fleetwide Bandwidth re-tunes every node in one coordinated move:
Width
Measured throughput*
Character
1 MHz
~0.9 Mbps
Maximum reach — thin, long links
2 MHz
~1.5 Mbps
Long range — best-validated range/capacity balance
4 MHz
~3.0 Mbps
Default — high capacity, best for map tiles
8 MHz
~6.6 Mbps
Strong-signal links only; loses reach fastest
*Mean UDP across node pairs at neighborhood ranges — treat as relative, not promised.
The optional second radio (2.4 GHz). A node can carry a small USB WiFi radio alongside HaLow, giving nearby nodes a high-bandwidth shortcut — tens of Mbps instead of a few — while HaLow keeps doing the long-range work. The mesh uses whichever link is better, automatically, and nothing breaks if the radio is absent, removed, or out of range.
Turning it on: the setup wizard offers it when a radio is fitted at first boot. Added one later? Settings → Radios → 2.4 GHz → Enable. It is never switched on by itself — that is deliberate, so a radio you fitted for another purpose is never commandeered.
Seeing it work: the Nodes tab shows a green 2.4G badge on any node meshing over it, and a node's detail view breaks signal out per radio (HaLow and 2.4 GHz, each with its own strength and speed). On the topology view those links are drawn in their own colour.
When it drops out: if the 2.4 GHz link between two nodes is lost suddenly — a radio unplugged or switched off, or a node carried out of the room — traffic between them is patchy for a short while as the mesh moves it onto HaLow, then carries on. On node firmware 0.23.0, switching a node’s 2.4 GHz radio off cost one gap in replies of about ten seconds in testing (up to about thirteen, depending on timing), then traffic carried on over HaLow. On older firmware a sudden loss could cost close to a minute, and a node that the mesh knew by its 2.4 GHz radio went silent for about three and a half minutes when that radio dropped; from 0.23.0 every node is known by its HaLow radio, so losing the 2.4 GHz radio no longer takes the node with it.
A link that stops delivering is set aside (node firmware 0.23.0): a 2.4 GHz link can look healthy — a strong signal and a high speed — while almost nothing gets through it. On older firmware that could leave a node reachable from some teammates and not others until it was restarted. Now each node checks that its own 2.4 GHz link really delivers. When it doesn’t, the node sets that link aside: its traffic moves to HaLow within seconds, and meanwhile the node’s own view lists its 2.4 GHz links at 1.0 Mbps. The node keeps re-testing the link without sending traffic through it, and gives it back once it delivers again — often within a minute, at most a few. Nothing is cut off: a node with no HaLow path keeps using the link. There is no app setting for this. If one node keeps setting its 2.4 GHz link aside, that link isn’t delivering; turning that node’s 2.4 GHz radio off (Settings → Radios → 2.4 GHz → Disable) leaves HaLow carrying everything.
A weak 2.4 GHz link delivers what it receives (node firmware 0.23.0): on older firmware the receiving node threw away part of what its 2.4 GHz radio had already confirmed, a few percent on a close link and most of it on a weak one, with nothing on either node showing it, so photos and maps over that link came slowly or not at all. In testing, a weak link that lost 56–63 % of a transfer lost 5–14 % once the receiving node had the fix. If 2.4 GHz transfers between two nodes are poor and either node runs older firmware, update it (§13).
Range reality: 2.4 GHz is short-range — same room, same vehicle, same rooftop. It is an addition for nodes that are close, not a replacement for the mesh that reaches across a ridgeline.
Pre-flight. Tap Pre-Flight and confirm every node shows green. If any node is unreachable, don't proceed — a staged change aborts everywhere rather than leave the fleet split.
Change Fleet. All nodes stage the new width, then reboot together. Expect roughly two minutes of mesh outage while they re-peer.
Confirm Keep. The fleet comes back UNCONFIRMED with a countdown. Tap Confirm Keep to lock it in — if you don't (say the new width broke your links and you never reconnected), every node reverts itself to the old width in ~10 minutes. That auto-revert is the safety net; don't fight it, just re-try with a more conservative width.
One change at a time (node firmware 0.23.0 with a current app): while a change is UNCONFIRMED, the width buttons, Pre-Flight and Change Fleet are greyed out and the card says what to do. Confirm Keep appears only when every node is running the new width; if any node did not take the change — or this node is still on the old width — the card says so and offers nothing to confirm, because confirming would leave that node to move to the new width alone at its next restart. Let the countdown run out (every node returns to the old width and restarts on its own), then change again. If a node drops off between the card offering Confirm Keep and your tap, the node refuses to keep the change and says so; every node then reverts together. A node also refuses a fleet change while any node in the fleet still has one waiting, or while a node does not answer — the app says Width not changed and lists which nodes; nothing is staged and nothing restarts. On older firmware a second change started on top of an unconfirmed one could, if it failed, cancel every node’s countdown and leave the fleet on the unconfirmed width with nothing to bring it back. A firmware update also waits for an unconfirmed width change (§13).
Caveats. Change width only when the whole fleet is up and reachable. 8 MHz is a strong-signal option — it falls off with distance faster than any other width and hasn't been validated on long field links. If one node misses the change it stays manageable (all widths share an anchor frequency), but mixed widths pass data poorly — re-stage the straggler so the fleet converges on one width.
Run ATAK-CIV? Every CicadaTAK node speaks native CoT, and the bridge is on by default — join any node's WiFi from your Android and the whole team appears in ATAK. No TAK server, no plugin, no network config: the node broadcasts on ATAK's stock mesh-SA address (239.2.3.1:6969), which ATAK-CIV listens to out of the box.
Set your ATAK identity. In ATAK: Settings → callsign and team color. CicadaTAK maps team colors both directions, so your color in ATAK is your color on every teammate's map.
Join the node's WiFi. The same network the CicadaTAK app uses. When Android warns the network has no internet, choose stay connected — better yet, turn mobile data off, or some phones silently move traffic to cellular and ATAK never hears the mesh.
That's it. Nodes and teammates with a GPS fix appear as PLI in ATAK; your position flows back to every CicadaTAK app, node and ATAK device on the mesh. Chat and markers cross the bridge too.
Under the hood, CoT never crosses the radio: each node translates to CicadaTAK's compact mesh protocol, carries it over HaLow with retries (or falls back to LoRa for positions and chat — ATAK never notices), and re-emits CoT on the far node's WiFi. That's why it keeps working at ranges where raw multicast meshes go quiet.
Hostile and neutral markers — what survives the trip
Drop a marker in ATAK and it crosses to every teammate. On firmware 0.15.0+ its affiliation crosses too: a hostile arrives red, a neutral green, an unknown yellow, and a friendly blue — so nobody has to read a type string off a map. Before this, everything you dropped arrived as a friendly team member, which is the dangerous direction to be wrong in: a hostile contact appeared on the team's map as one of the team.
One hop only, and it degrades safely. A marker that reaches your node from ATAK and is then relayed onward by a second node loses its affiliation on that second hop — a hostile arrives at the far end as unknown (a yellow diamond) rather than as hostile. It never turns back into a friendly, so the failure is a loss of detail, not a lie. While a team is mid-upgrade, treat affiliation as unreliable: a node still on 0.14.0 or earlier that receives a hostile marker re-broadcasts it to everyone as a friendly person. Affiliation is only trustworthy once every node on the mesh is upgraded — so upgrade the whole team before relying on it, and confirm a marker's identity over chat or voice until you have.
Team Role — how you appear to ATAK users
Settings → Operator’s Info → Team role (firmware 0.15.0+; before the app update after 1.2.46 it was under Settings → ATAK). Pick your job on the team: Team Member (the default), Team Lead, HQ, Sniper, Medic, Forward Observer, RTO or K9. These are ATAK's own eight roles, spelled ATAK's way — which is the point: the role rides along with your position, so ATAK users see you in the role you picked, with the matching icon, without anyone configuring anything. It's the same setting an ATAK user sets in their own identity screen.
It also decides which GeoChat room you're in. ATAK puts everyone with the same role into a shared chat room, so a Medic can call all Medics. That matching is case-sensitive inside ATAK, which is exactly why the app offers a fixed list instead of a free-text box — a hand-typed "medic" would be stored and displayed, would draw the plain team icon, and would put you in no room at all, with nothing anywhere reporting a problem.
The role chips are shown only for a node set to Worn under What is this node? (§01; after setup, Settings → This Node → Node Configuration). For any other node the card says so and where to change it. Vehicle, fixed-relay and unattended nodes are equipment, not people — they carry no team membership at all, so a role would mean nothing. The setting belongs to the node, not to your phone: it is stored on the node and survives reboots and firmware updates, so walking to a second node shows that node's answer.
Whole team, same understanding. Team Role is cosmetic-but-load-bearing: it changes your icon and your chat room, not your position or your reachability. Nobody is dropped from the map for picking the "wrong" role — but if half the team leaves it on Team Member, the role rooms are half-empty and quiet in a way that looks like a fault.
Offline imagery in ATAK
Your node can serve its downloaded imagery straight to ATAK as a map layer — no internet, no TAK server. On the node's WiFi, open http://10.41.254.1:8080/atak in a browser (firmware 0.15.0+ — on 0.14.0 and earlier this page does not exist and the browser shows a "Not Found" error; update the node first). Download the file it offers, then in ATAK use Import Manager → Local SD and pick it from your Downloads folder. The layer appears under Maps & Favorites → MOBILE — not the IMAGERY tab, which is where most people look first.
Any way in works, not just the node's WiFi. The files the page builds point back at whatever address you used to reach it — so a laptop on the wired link (http://10.41.253.1:8080/atak), a machine reaching the node over the mesh, or a browser on your home network all produce a package that actually works from there. Previously the files always claimed the WiFi address, which imported cleanly and then drew a blank map from anywhere else.
If you've set an API key on the node, open the page as /atak?api_key=YOUR_KEY — the page will say so at the top when it applies to you. The key gets built into the files it generates. Without it the package downloads and imports perfectly and then shows no imagery at all, because every tile request is refused, and nothing anywhere reports an error. Most nodes have no key set and this doesn't apply.
The same page offers a settings file that slows ATAK's position reporting from its default of once every 30 seconds to once a minute. ATAK's defaults are written for a local network, not a radio mesh; the file halves how much of your channel each device spends announcing itself. Rename it to defaults, with no file extension, drop it in atak/config/prefs/, and restart ATAK — it applies itself and then deletes itself.
Two ATAK settings will silence your node, with no error anywhere. Both are under Settings → Network Preferences → Network Connection Preferences. Mesh Network Mode switched off disables every input and output at once. And AES-256 Mesh Encryption switched on means your team encrypts its position reports with a key the node doesn't have — CicadaTAK nodes disappear from your map, your position stops reaching your teammates' CicadaTAK apps, and nothing reports a problem in either direction. Leave encryption off unless you've checked with us; your mesh traffic is already encrypted at the radio layer.
One dot per person on a mixed team
When some of your team runs ATAK and some runs the CicadaTAK app, each operator used to appear twice — once as their ATAK marker and once as their node's callsign, a few metres apart. Both were real; they were just two names for the same person. Each app now keeps the identity it owns and hides the other's copy, so everyone shows up once whichever app you're looking at. A node genuinely left behind — bolted in a vehicle, say, while its operator walks away — still shows separately, which is correct. This is an app change: a teammate on an older app build will still see the doubles until they update.
Each node shows up twice in ATAK for a few minutes after the update to node firmware 0.23.0. From 0.23.0 ATAK knows each node by its permanent identity instead of its name, so renaming a node no longer gives ATAK a new contact. The change itself happens once: when a node takes the update, ATAK keeps its old contact, greys it out after about two minutes and removes it about five minutes later. A phone that moves between a node still on older firmware and an updated one can see a teammate twice for those few minutes.
Caveats. Your phone must be on a node's WiFi — CoT lives on the local phone leg, not the radio link. Positions and chat are validated both directions against current ATAK-CIV (including encrypted team chat — the node translates so ATAK reads it in the clear, and understands ATAK's binary mesh protocol on the wire). ATAK direct messages aren't bridged yet — use All Chat Rooms. Your nodes appear on the ATAK map but not in its Contacts list, so you can't send one a direct message or a file. When positions and chat ride the LoRa fallback, that's all that rides it: photos and voice need the HaLow link. Want the bridge off? Settings → Team → ATAK Compatibility (the last thing on the page) in the CicadaTAK app turns it off for the node you are connected to; every other node keeps its own.
12Phone-direct mode — no node at all
The app can also skip the node entirely and pair straight to a handheld Meshtastic radio over Bluetooth: Settings → Connection → Meshtastic Radio, scan, pair (iOS asks for PIN 123456). You get the same map, encrypted team chat and public chat, positions, and LoRa mode control — a pocket-sized fallback that interoperates with the full fleet.
The radio isn't in the scan list. Almost never the app. Work down this list before anything else — and note the card now tells you which of these it can see for itself: it shows a live Bluetooth line (On / Off / Not permitted / Unavailable), greys out Connect with the reason when Bluetooth can't be used, and offers Open Settings when the phone is the thing blocking it.
Is the radio advertising? Check the radio itself before suspecting the phone — it must be powered on with Bluetooth enabled in its own settings. A radio that is asleep, flat, or has BT switched off is simply not there to find.
Is something else already holding it? A Meshtastic radio serves one Bluetooth client at a time. If the Meshtastic app, another phone, or a tablet is connected, the radio stops advertising and no scan will show it — disconnect the other one first. If your own phone is the one holding it open, CicadaTAK lists it anyway and says so.
Reset the board. On an nRF52 radio (RAK4631, T-Echo) this is the first move, not the last: after a refused or timed-out pairing its Bluetooth stack stops advertising and stays that way until the board is reset. Tap the reset button, wait ten seconds, scan again.
Then the phone. Bluetooth on; CicadaTAK allowed to use it (iOS: Settings → Privacy & Security → Bluetooth; Android: Nearby devices); and on Android, location permission — Android will not return Bluetooth scan results without it.
"Paired device" used to overstate things. The card once listed the last radio you picked under the heading Paired device, which read as "this phone is bonded to that radio" when all it meant was "this is the one you chose last time". It now says Radio with a live CONNECTED / CONNECTING / NOT CONNECTED chip, and carries a Forget this radio action. Needs app 1.2.33+.
Changing the radio's mode, preset or team key restarts it (the radio needs a restart to apply them), and Bluetooth drops while it does. From the app update after 1.2.46 the app reconnects to the radio by itself — the card says the radio is restarting, and if it is not back within about a minute it says so and asks you to tap Connect. A drop the app did not cause — walking out of range, the radio switched off — still waits for you to tap Connect, deliberately: redialling every lost link would hide a real fault.
Renaming the radio. From the app update after 1.2.46: Settings → Operator’s Info → Rename radio. Give it a name (and, optionally, a short name of up to 4 letters; leave that empty to keep the one it has). The radio restarts to take the new name, and the app reconnects to it by itself; teammates see the new name the next time the radio announces itself.
Nothing is shown as sent unless the radio got it. From the app update after 1.2.46. A chat message that never left your phone — Bluetooth dropped, or the link went while it waited its turn — shows a red ! instead of a ✓, and long-pressing it says to check the radio and send it again. A ✓ on a radio message means your radio got it: radios do not confirm delivery yet, so it never turns into ✓✓. A marker that did not reach the radio brings up a message saying it is on your phone only (edit it to send it again); a delete that did not reach it puts the marker back, because your teammates still see it. Changing the radio’s mode, preset, team key or name now waits for the radio to take it — if it does not, the app says so and keeps everything on the phone as it was, including your old team key.
The satellite map with no node. From the app update after 1.2.46. With no node, SAT comes straight from the US Geological Survey’s aerial imagery of the United States (Alaska, Hawaii and Puerto Rico included), down to about street-and-house detail (zoom 16); closer in, that view is shown enlarged. Elsewhere, where that imagery has no picture, SAT shows your phone’s own satellite map instead, which needs internet. Before this update SAT with no node showed nothing at all. With a node, SAT is the node’s own imagery, as before.
Caveats. Phone-direct is positions + text only: no photos, no PTT, no offline tile downloads, and the Fleetwide Bandwidth card hides (there's no fleet to command). Identity comes from the radio — the phone only fills in GPS if the radio lacks a fix. Offline maps still work, but they have to be your own: the in-app aerial downloader covers the United States only, so load an .mbtiles pack onto the phone (section 4). Outside the US, Canada, Mexico and Australia this is the mode the app is sold for: CicadaTAK nodes are US-only, so set the radio's LoRa region for your country (Share QR asks if the radio has none) — the app uses the radio's own region and never overrides it.
Settings → Connection — node WiFi or radio Bluetooth
13More nodes, updates & reset
Renaming a node (node firmware 0.23.0 with the app update after 1.2.46): Settings → This Node → Node Configuration → Node name → Rename. The node name is also its Wi-Fi network's name, so this replaces the old WiFi AP SSID field. The node's Wi-Fi network takes the new name too, and the node restarts, which takes about two minutes. The app tells you the network's new name before anything changes: when the node is back, go to your phone's Wi-Fi settings and join it, with the same Wi-Fi password (your phone asks for it once, because the name is new to it); the old network is gone. If your phone joins a different node's Wi-Fi instead, the app says so. Teammates whose nodes run firmware 0.23.0 drop the old name within a couple of minutes, and ATAK there keeps the same contact; on a teammate's node with older firmware the old name greys and goes within about ten minutes, and ATAK there shows the node as a new contact. The callsign, the LoRa radio's name and your settings, maps and history are unchanged. The node refuses to rename while it is installing an update, running a team update, waiting for a channel-width change to be confirmed or setting up its LoRa radio, or when a teammate on the mesh already uses that name, and says which. Rename stays greyed out while Node Configuration has changes you have not applied: renaming restarts the node and would lose them, so tap Apply & Reboot first, or undo them. If the node comes back with its old name, rename it again; it finishes an interrupted rename by itself at its next restart. On older node firmware, Rename tells you to update the node first: update it, then rename it.
Adding a node: flash another card (download page), boot it, join its CicadaTak-XXXX setup WiFi and the app's wizard takes over — or use Settings → This Node → Setup New Node. Give it the same team passphrase and it joins the mesh.
Blank LoRa board? A factory-fresh Heltec (V3 — or V4, on node firmware 0.5.0+) needs the right Meshtastic firmware, and the node writes it for you either way — no computer needed. If the board is plugged in before first boot, the setup wizard flashes it automatically. If you add one later, to a node that's already set up, go to Settings → Radios → LoRa Mode: the card tells you a device is attached but not answering, and offers Flash Meshtastic Firmware. Takes 1–3 minutes; don't unplug the board, and the node doesn't reboot or re-run the wizard. If two LoRa radios are plugged in and the node has not chosen its own yet, the flash refuses and asks you to Choose This Node's Radio… first — it will not guess which board to erase; it also waits while a guest radio is being provisioned. Not sure the radio is really talking? The LoRa page's Check Radio Is Alive asks the board a question it has to answer and reports the round trip — the status line above it is what the node last heard, not a live check. That refusal and Check Radio Is Alive both need firmware 0.21.0+; on an older node the button tells you the node's firmware needs updating.
Heltec V4? Supported — gateway-attached and phone-direct — with one limit: not beside the 2.4 GHz mesh radio. A node can’t power a V4 and the 2.4 GHz mesh radio at the same time (together they overload the node’s USB power, even at low LoRa power), so run a V4 node on LoRa and HaLow, without it. If you want the 2.4 GHz mesh, use a Heltec V3. On node firmware 0.5.0 or newer the node flashes a V4 in place exactly like a V3 and configures it automatically. (The V4 runs stock Meshtastic firmware, so the board's own screen and buttons behave stock — bridging, encryption and the app are identical to a V3.) On older node firmware, flash the board once from a computer — flasher.meshtastic.org, pick Heltec WiFi LoRa 32 V4, latest stable firmware, LoRa region US — or your node's region if it isn't US; either way the node rewrites this when it adopts the board, so it only matters until then (if the flasher won't connect: hold PRG, tap RST, release PRG, retry) — then plug it into the node, which adopts and configures it. If the LoRa link doesn't come up within a couple of minutes after plugging in an already-flashed board, restart the node — firmware before 0.5.0 had a connect bug that a restart clears. Phone-direct mode (Settings → Connection → Meshtastic Radio, §11) works with a V4 as before. From node firmware 0.22.0 a V4 transmits at 20 dBm by default. The V4’s own amplifier turns the old “full power” setting into about 28 dBm, which is over Australia’s limit once an antenna is on it — every image through 0.21.0 ran a V4 that way, and a MeshCore V4 now gets the matching drive level. ⚠ The node won’t stop you turning the 2.4 GHz mesh on beside a V4. If you do, the two overload the Pi’s shared USB power switch, most of all in the first minute after power-up and even at the lower default power: both radios drop off the node at the same moment (LoRa stops, the 2.4 GHz link disappears) and come back on their own within a few seconds. From node firmware 0.23.0 the node notices that trip itself and tells you (USB power overload, in the node’s warnings, §05), and it notices a radio that keeps losing power and restarting before it can run — a weak cable, plug or supply, or a flat battery on a radio that has one: the LoRa page says so in those words and offers no firmware install, because the fault is power, not firmware — check the cable and port, try another, and charge or disconnect the radio’s own battery. A firmware install also now follows what the radio itself says it is: a T-Beam or T-Deck, which looks exactly like a V4 to the USB port, is no longer offered the V4 image, and a radio that reports another board is refused in those words rather than erased.
Firmware updates (in place): nodes on images from 2026-07-24 onward update without pulling the card. From the app: Settings → This Node → Node Firmware → Check Latest → Pull Update → Apply (the node needs an internet uplink to pull — every way to get one is in the next step). Or grab the update file (~50 MB) on a laptop, plug into the node's wired port, and browse to http://10.41.253.1:8080/update to upload it directly — no internet needed at the node. Either way the node reboots (~3 min), keeps its identity, team key and downloaded maps, and does not re-run the wizard. Don't cut power mid-update. A node with a bandwidth change still waiting to be confirmed will not install an update (firmware 0.23.0): it says so, and either sends you to Fleetwide Bandwidth (§10) — Confirm Keep there if it is offered, or let the change revert — or, when the change never took effect on that node, tells you it reverts on its own. Then Apply again; the update stays downloaded. In a team update such a node is skipped with that sentence. (The update file is only for nodes already running — flashing a fresh card takes the full image from the download page.)
Updating a whole team (node firmware 0.23.0 with a current app): update one node first — the one with the best internet connection is fastest — with Check Latest → Pull Update → Apply as above. When it comes back, its Node Firmware card offers Update Team. Tap it, read the plan it shows (which node goes first, how many are updating, roughly how long) and confirm. The nodes then update one at a time: a test node first, then the rest, then the node that is providing the internet. The node you are on already has the update from the first step, so it stays online throughout. Each node is offline for about three minutes while it restarts, and the team runs on mixed versions until the last one finishes — so do this before a deployment, not during one, and keep the team in range of each other. The card shows every node’s line in its own words; you can put your phone away, the node you are on runs the update by itself. If the test node does not come back on the new version, the update stops there and nothing else has changed. A node the update cannot reach, or that cannot download it, is skipped and its line says why — it stays on its old version and nothing else is affected: bring it back in range or give it internet, then tap Update Team again (nodes already updated are left alone), or update it on its own. A node that is too slow to download is given the update from the node you are on, over the mesh, instead. If a node does not come back within ten minutes the update pauses and asks: switch that node’s power off and on (including any backup battery), then tap Continue, or Skip to finish without it. While it coordinates, the node you are on refuses its own Apply — stop the team update first if you need that. Nodes on firmware 0.22.0 or older can be updated this way but cannot start a team update, and an update never moves a node backwards: a node already on something newer is left as it is.
Getting a node an internet uplink: any of these work, and you only need one node online — its uplink is shared to the whole mesh automatically, so every other node can pull its update through it.
Ethernet (the path to trust): run a cable from any internet-connected router or switch to the node's wired port. On node firmware 0.23.0 and later the wired port is a USB ethernet adapter — a USB-C one plugged into the Native Port, or a USB one plugged into the accessory port; the sealed M12 jack is gone from field nodes (that hole now carries the GPS antenna). Plug the adapter in any time, before or after boot. No config — the node detects internet and becomes the mesh's gateway within seconds, or within about half a minute of boot if the cable was already in. One wire per network: two wires from one node into the same switch does nothing useful. If the app shows "Wired connection has no address", the cable is plugged in but nothing on the other end handed out an address — check the router, or unplug it. (A direct cable to a CicadaDeck needs no address and is fine.)
Android phone, USB-tethered (node firmware 0.23.0 and later): plug the phone into the node's USB port and turn on USB tethering in the phone's settings. The node takes an address from the phone and uses it like a wired connection; a cable to a router still wins if both are plugged in. Everyone on the team uses this phone's mobile data while it is plugged in — firmware updates and map downloads included — so unplug it to stop. Older firmware does not set up a USB tether, so use ethernet there. (iPhone: 0.23.0 includes the driver for Personal Hotspot over USB, but it has not been tested on a node yet — if it does not come up, use ethernet.)
USB cellular modem: supported the same way — if it presents a network connection on USB, the node will use it. (A USB-ethernet adapter is simply the wired port above.)
What does NOT work: your phone simply joining the node's WiFi. On the node's WiFi your phone is a client — its cell data can't be shared to the node that way.
If an update says it didn't install: your node is fine — it is still running the previous firmware with your callsign, keys, maps and settings untouched, and you can simply try again. (On firmware older than 0.8.0 a failed update could send a node back to the setup wizard; that is fixed.) Give an update its full time before judging it: the node reboots partway through and briefly still reports the old version, which is normal.
If the node says its storage failed (node firmware 0.23.0 with the app update after 1.2.46): the warning Node storage failed means the node's storage could not be opened, so it started from memory. It works, and after an update it comes back with its settings, but anything changed now is lost when it restarts. To repair it: Settings → This Node → Node Firmware → Reinstall this version, then Reinstall Now when the download finishes. That reinstalls the version the node already runs, rebuilds its storage and keeps its settings; the node is offline for about 3 minutes, and it needs an internet uplink like any update. If an update is offered, installing it does the same. If the card says it cannot reinstall this version, reflash the node's SD card with the current firmware. If it happens again, replace the SD card.
If the setup page itself says “Node storage failed” (node firmware 0.23.0): the node's storage could not be opened and it had no saved settings to bring back, so it started in setup, from memory. You can run setup and use the node, but those settings are lost at its next restart. To keep them, finish setup, then reinstall the node's firmware as in the item above (the reinstall keeps what setup wrote). If the node cannot reach the internet for that, reflash its SD card. If it happens again, replace the SD card.
If the node's map storage is only about 6 GB on a bigger SD card: setup grows the map storage to fill the card from node firmware 0.23.0. A node set up on older firmware kept about 6 GB, and updating it doesn't change that by itself. Once the node runs 0.23.0 or later, its storage can be grown in place, keeping its maps and settings: contact support for the steps. Reflashing the SD card with the current firmware and running setup also does it, but starts the node over, downloaded maps included.
Firmware updates (older nodes / full reset): flash the latest image to a card and swap it in — the node re-runs the wizard on first boot. Watch the download page for releases, or join the release list from the home page.
Long-range (LoRa) radio stopped bridging? On firmware 0.14.0+ the node repairs this itself. If it cannot talk to the Meshtastic board it retries, and then power-cycles that board's USB port — the electrical equivalent of unplugging and replugging it — which clears a hung board within a few minutes. Nothing to do but wait. From node firmware 0.23.0 a board that has gone completely silent after a restart is power-cycled within about a minute instead of ten, the node checks that the board really came back (and cycles once more if it did not), and a node that has had nothing to send for a minute asks its radio whether it is still listening, so “connected” always means the radio answers — the same applies to a MeshCore radio. If it does not come back, suspect the USB cable rather than the board: a failing cable makes the board connect and drop every couple of seconds, and swapping in a different board will behave identically. Older firmware retried forever without ever reporting a problem — a node could sit with its long-range tier completely dead while everything else looked healthy, because the board keeps transmitting on its own and other nodes still see it. One visible clue on any version: the same node showing up twice in the Nodes list means exactly this — its board is on the air but that node isn't bridging it.
Health checks: Settings shows GPS state (none / down / no_fix / fix) and LoRa hardware status; the Nodes tab's ping tells you link quality node-to-node.
Battery & charging (PiSugar builds): plugging in a charger powers the node on automatically — the halo ring lighting up is your confirmation the charger is actually delivering power (there's no separate charge light). PiSugar nodes also keep real time across power-offs: the battery-backed clock is set from GPS while the node runs, so timestamps are correct from the first seconds after boot even with no internet.
Battery percentage & bigger batteries (PiSugar builds): battery monitoring is built into the firmware — the percentage in the app is read straight from the PiSugar's onboard gauge chip. If a node was started with no battery connected, the percentage appears on its own within a minute or two of connecting one (firmware 0.23.0 and later; on older firmware it appears after the node restarts). The same works the other way: if the battery is disconnected while the node keeps running, or the gauge stops answering, the percentage disappears within about a minute instead of staying frozen at its last value, and it returns as soon as the battery answers again (firmware 0.23.0 and later). Do not install PiSugar's own software on a node: it targets Raspberry Pi OS so it won't install on CicadaTAK firmware, and a second program talking to the battery chip over I2C can corrupt its state (worst case, cutting the node's power). The battery-curve "calibration" PiSugar's site describes for non-stock batteries is a feature of that software, so it doesn't apply here — there is no calibration step to run. The standard 10,000 mAh pouch pack is the battery the firmware is validated with: full discharge-to-shutdown testing confirms the gauge reads true near full and near empty, while mid-discharge the percentage can wobble a few points under radio load — that's normal. When you need a precise read, the battery voltage is the trustworthy number (roughly 4.1 V full, 3.4 V nearly empty).
Two USB-C ports? Only one of them charges. On enclosures with two USB-C bulkheads, the Charging Port is wired to the battery board and is the one to plug a charger into. The other, the Native Port, is the Pi's own USB-C: on firmware 0.13.0+ it is a USB host, for a wired PTT handset or other accessories — and on 0.23.0+ it is where the USB ethernet adapter goes for a wired internet connection. Never feed mains into the Native Port while a battery is fitted — two supplies end up on one rail, and in testing that crashed the node on plug-in and killed it on unplug.
Node won't wake and the button does nothing? Plug a charger into the Charging Port. The button is read by software, so if the node lost power in a way that left the battery board's output switch on, the board still believes the node is running and no button press will revive it. Power from the charging port is the way back in — this is the recovery path, not a repair.